Experiment Tracker Pipeline Template
Keep every experiment in one living map
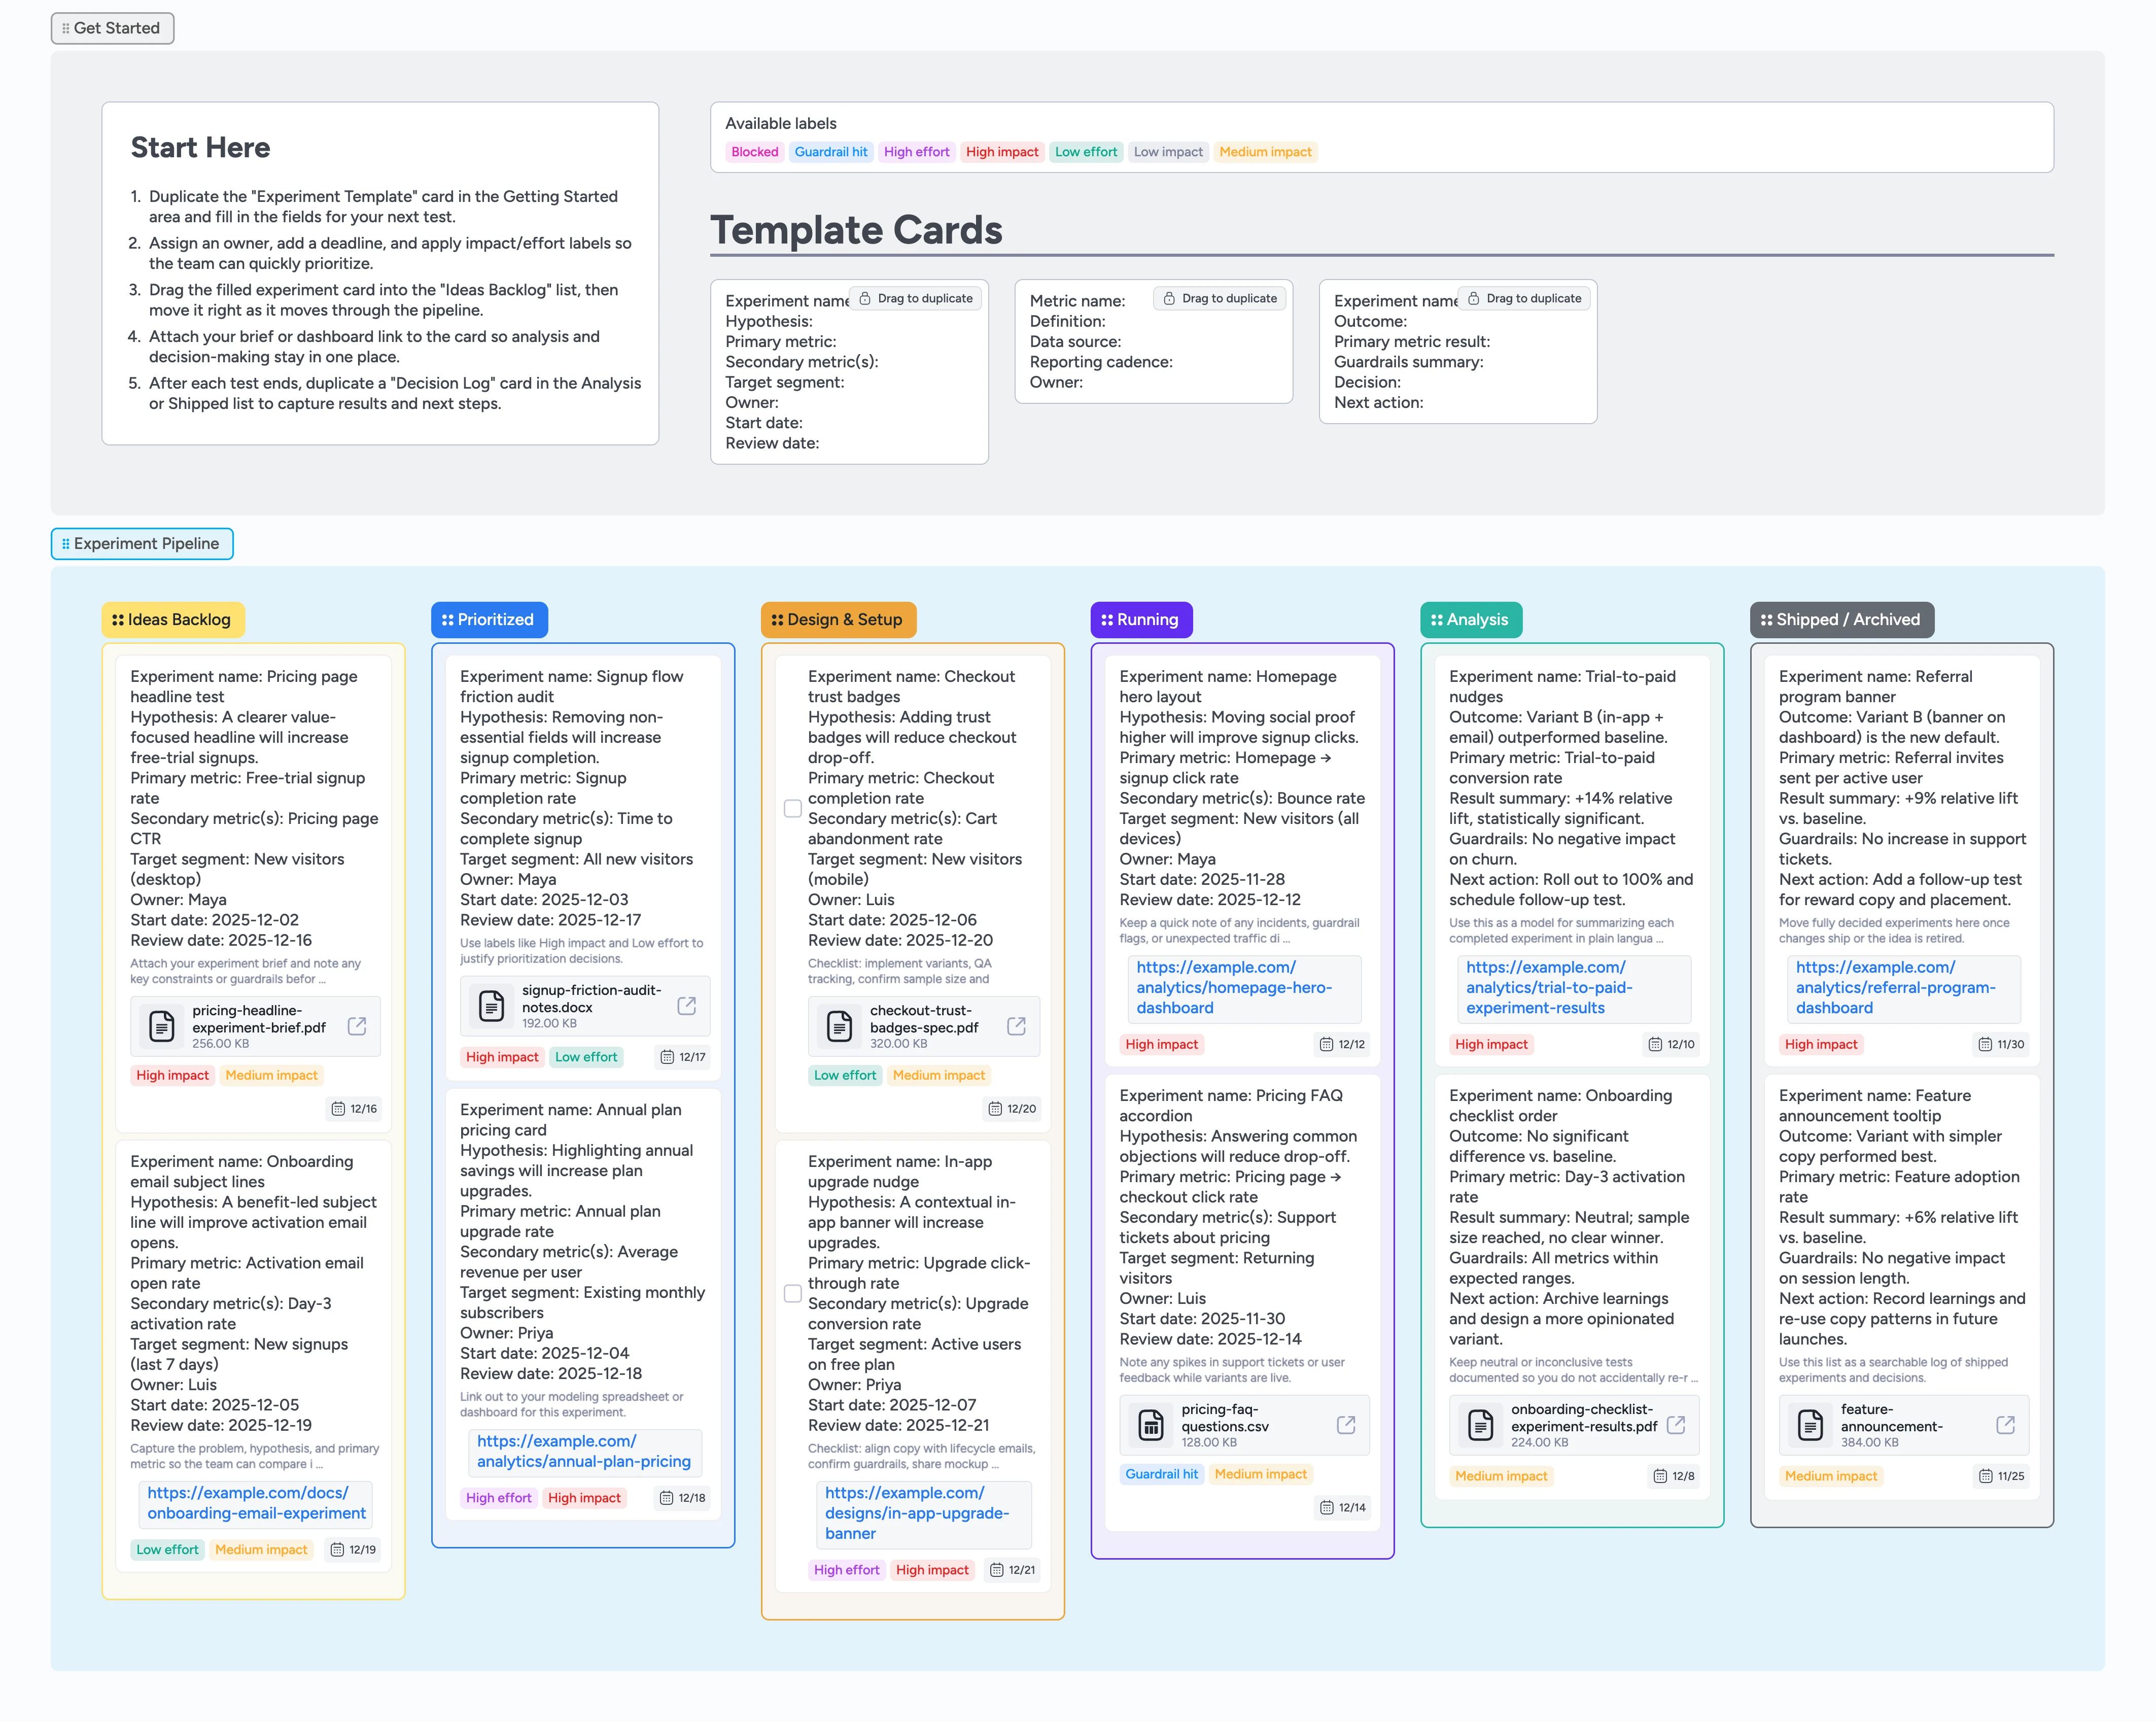
Experiment ideas usually live across notebooks, spreadsheets, dashboards, and random Slack threads—making it hard to see what is running now, what is up next, and what actually worked. This template turns that mess into a single Instaboard pipeline where every experiment has a structured card, clear owner, and agreed metrics. Ideas start in a shared backlog, gain impact and effort labels, and then move through design, setup, running, analysis, and shipped stages. Along the way, briefs, dashboards, and decision notes stay attached to the card so your team can revisit context and learnings long after a test ends.
- Centralize experiment ideas, in-flight tests, and shipped learnings on one board
- Standardize hypotheses and metrics with duplicate-locked Experiment Template cards
- Make prioritization easier with impact and effort labels across stages
- Keep owners accountable with assignees, due dates, and status lists
- Attach briefs, dashboards, and decks directly to experiment cards
Start in Getting Started with your first idea
Begin in the Getting Started area by duplicating the Experiment Template card and renaming it for your first experiment. Fill in the hypothesis, primary and secondary metrics, target segment, owner, start date, and review date fields on the card. Assign the owner, set a due date that matches your planned review date, and apply impact and effort labels so the team can quickly compare it to other ideas. Attach any existing brief, research doc, or dashboard link so context travels with the experiment. When the card feels complete, drag it into the Ideas Backlog list to join the rest of your pipeline.
Prioritize and schedule experiments together
During planning, sort the Ideas Backlog by dragging the most promising cards to the top, then move chosen experiments into the Prioritized list. Use labels like High impact, Medium impact, Low impact, Low effort, and High effort to make tradeoffs visible without digging into descriptions. Adjust due dates to reflect when you expect each experiment to start and review results so timelines stay realistic. Tag collaborators on the card and add quick notes in the description if you need additional input or approvals. As soon as an experiment is ready to scope in detail, drag it into Design & Setup.
Pro tip: Rename or add labels to match your own impact and effort language while keeping the same visual system.
Design, instrument, and launch your tests
In the Design & Setup list, duplicate the Metric Definition micro-template for any metric that needs a clear owner and reporting cadence, then link those cards from the main experiment. Use the experiment card description or attached files to capture implementation details, guardrail checks, and experiment IDs before anything goes live. Assign engineering, design, or data partners directly on the card and set short-term due dates for setup milestones. Once instrumentation and QA are complete, drag the experiment card into Running and attach the analytics dashboard you will use to monitor performance. Apply the Guardrail hit label if you spot issues that need a fast stop or review.
Review results and log decisions
When the planned run window ends, move the experiment card into the Analysis list and duplicate a Decision Log micro-template nearby. Summarize the outcome in that Decision Log card—include metric results, guardrail checks, and the recommended decision—then link it back to the main experiment card. Attach exported charts or a short Loom walkthrough where helpful so future readers can see the story behind the numbers. Once the team agrees on the decision, drag both cards into Shipped / Archived to keep a permanent record. Use labels and search to quickly review past experiments before planning your next cycle.
What’s inside
Experiment Pipeline section
Left-to-right lists from Ideas Backlog through Prioritized, Design & Setup, Running, Analysis, and Shipped / Archived so everyone can see experiment status at a glance.
Start Here and micro-templates
A Start Here card plus duplicate-locked Experiment Template, Metric Definition, and Decision Log cards that keep every experiment structured the same way.
Impact and effort labels
Pre-made labels like High impact, Medium impact, Low impact, Low effort, High effort, Blocked, and Guardrail hit so prioritization signals are visible on the board.
Demo experiments with real metadata
Sample cards filled with hypotheses, owners, due dates, and attached briefs or dashboards to show how a healthy experiment pipeline looks in practice.
Decision log lane
Analysis and Shipped / Archived lists with Decision Log micro-templates so outcomes, guardrails, and next actions are captured while the results are fresh.
Why this works
- Turn scattered experiment notes and spreadsheets into a single source of truth for every test
- Bake consistent hypotheses and metric definitions into duplicate-locked cards so results stay comparable over time
- Keep owners, timelines, and guardrails visible with assignees, due dates, and status-aware labels on every experiment card
- Preserve a searchable history of decisions and learnings by parking completed experiments in Shipped / Archived with linked Decision Logs
FAQ
Who is this experiment tracker template for?
This template is built for product, growth, and marketing teams that run recurring experiments and need a single place to track ideas, active tests, and shipped learnings.
How does this work with my existing analytics tools?
Keep using your current analytics stack and simply attach dashboards, spreadsheets, or notebooks to experiment cards. Instaboard becomes the control center for status, owners, and decisions instead of replacing your data tools.
Can I change the stages or labels?
Yes. Rename lists, add or remove stages, and edit labels so they reflect how your team already talks about experiments while keeping the same left-to-right flow.
Is this overkill for a small team?
Even a small team benefits from seeing all experiments on one board. You can start with just a few lists and one or two labels, then grow into the full pipeline as your volume increases.