Etsy Embroidered Hats Production Template
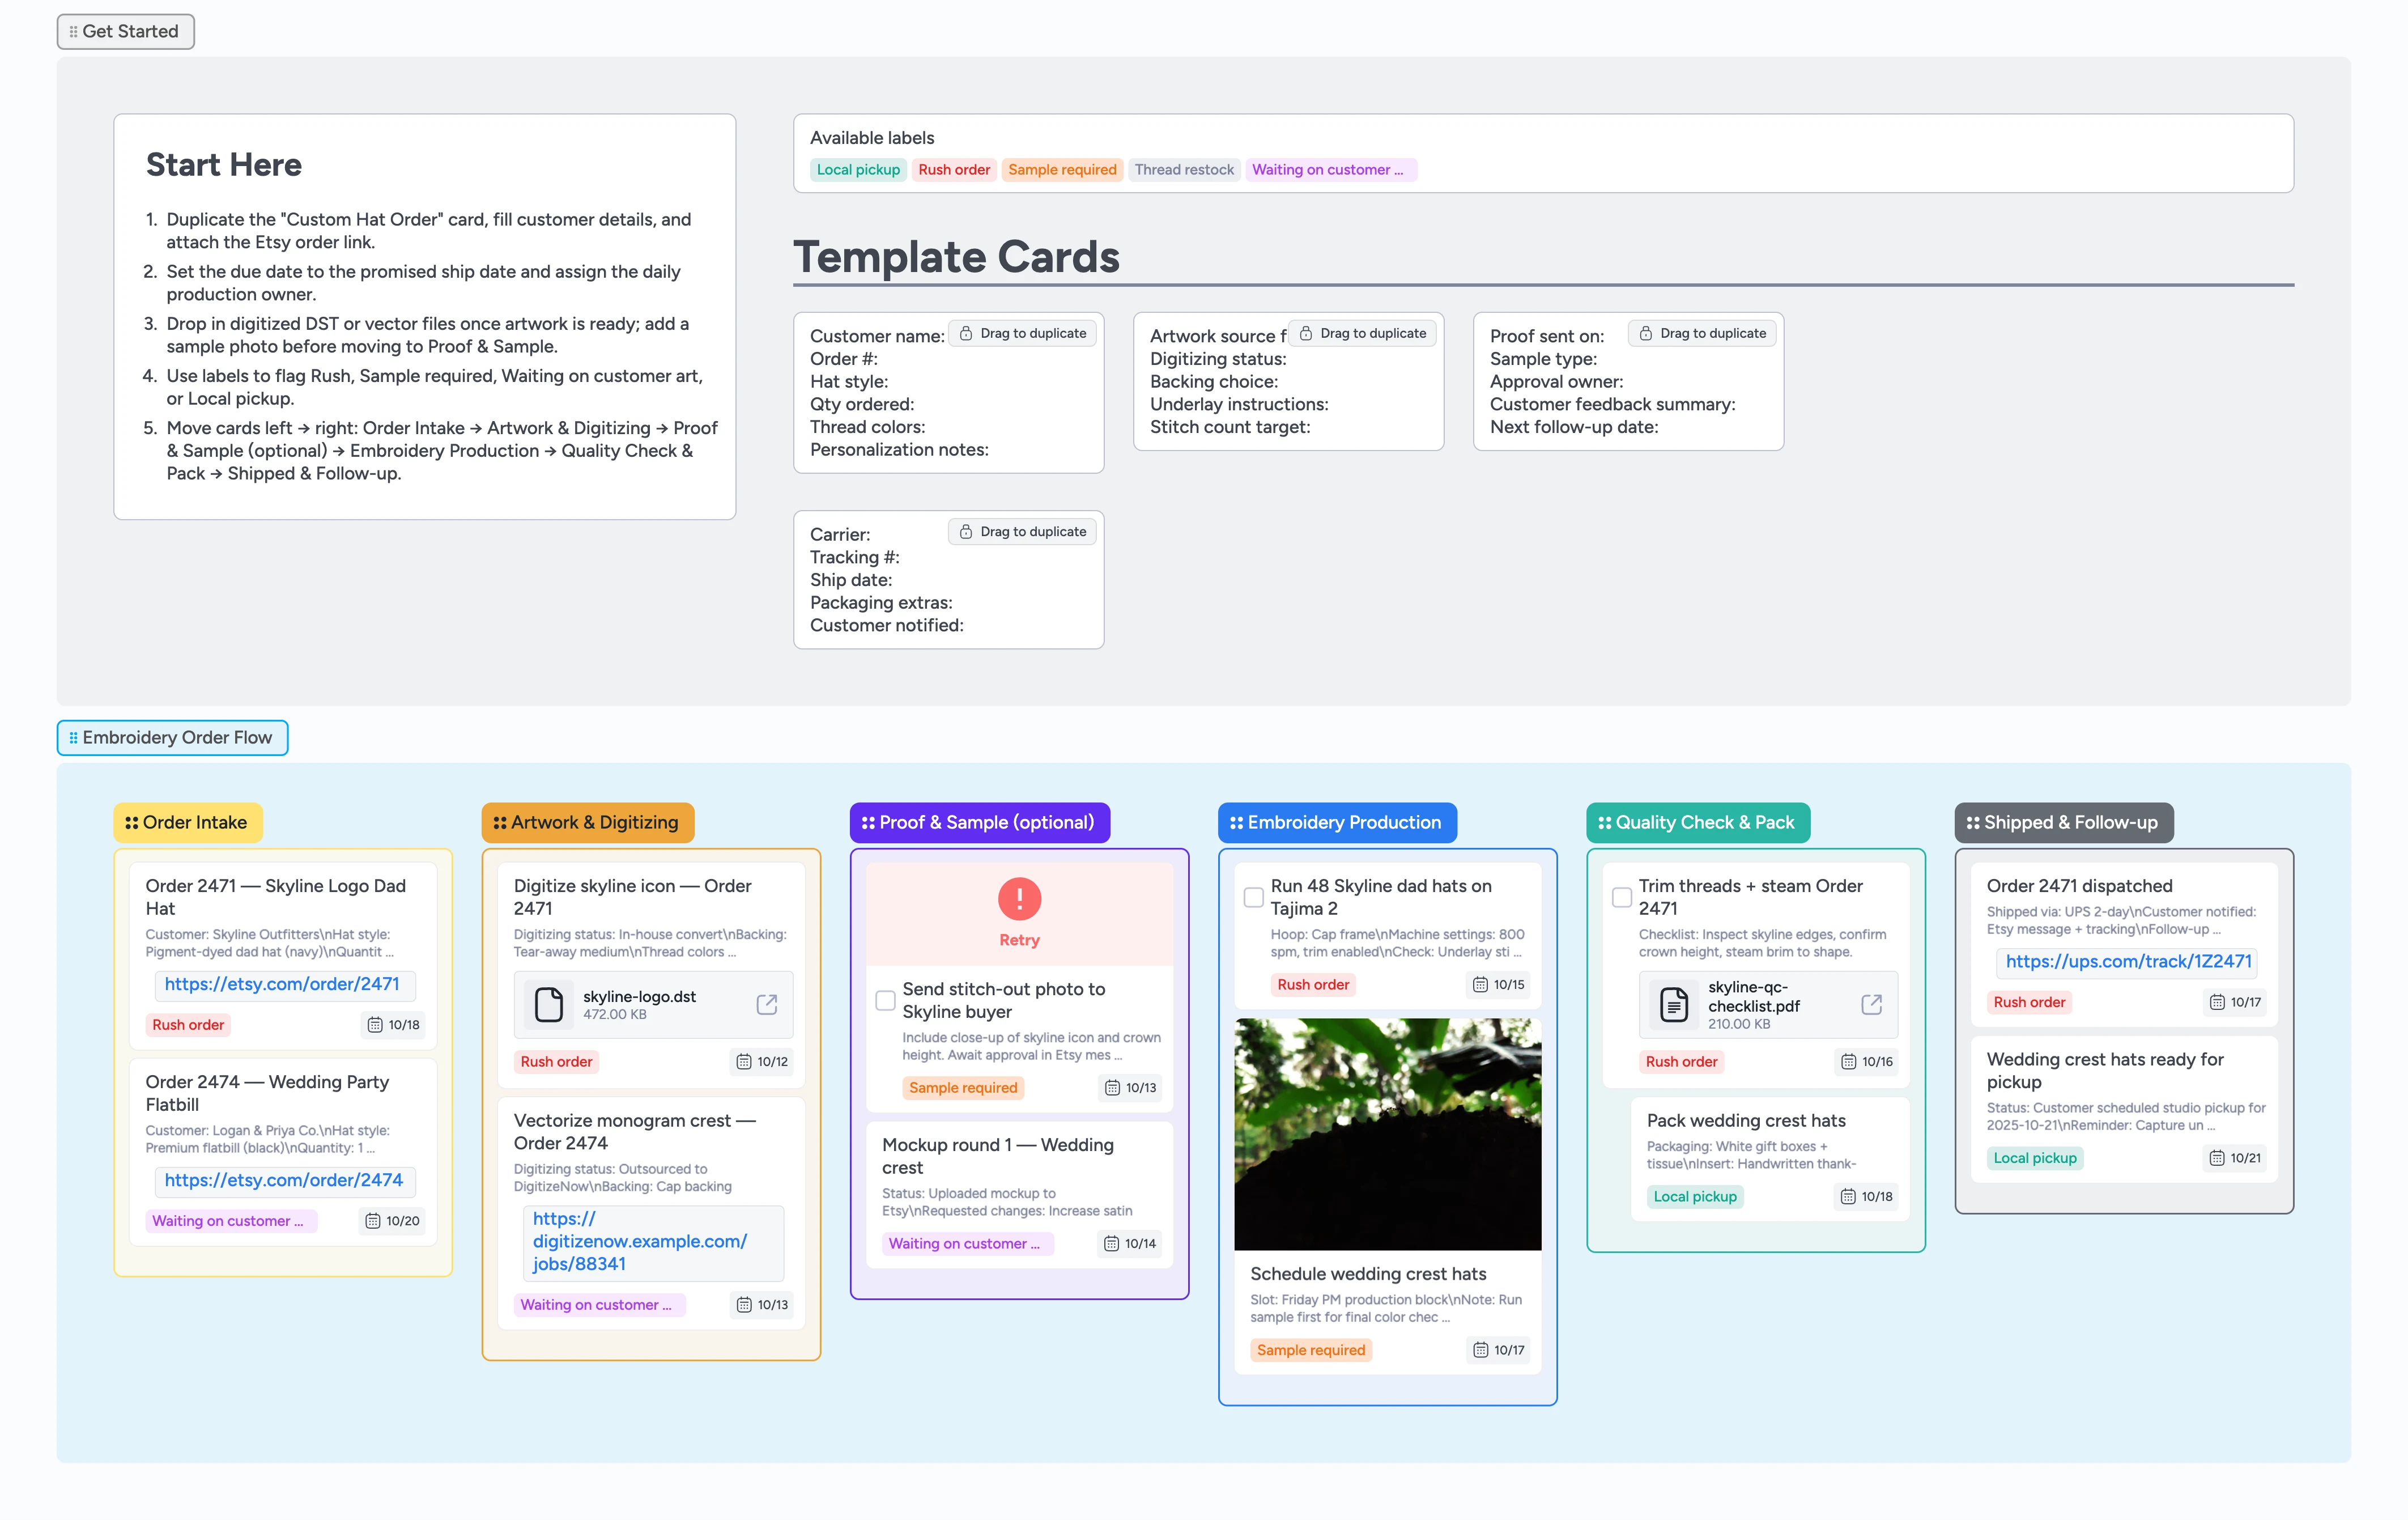
Run every custom hat like clockwork
Embroidered hats take more than a to-do list — you have art files to digitize, samples to approve, and finished caps to steam and ship. This template maps the entire flow for small Etsy teams: start with a duplicate-locked order card, move through digitizing, proofing, and production, and finish with a shipping checklist that keeps tracking and follow-up in the same place. Use labels to flag rush jobs, customer delays, or pickup orders so nothing slips while you juggle machines and messages.
- Standardize every order with duplicate-locked intake fields
- Track digitizing approvals on the same card attachments
- Batch embroidery runs with list-level WIP limits
- Ship faster with pre-filled shipping checklist cards
Start every order in Intake
Open the Get Started section and duplicate the locked “Custom Hat Order” card. Fill customer name, order number, hat style, quantity, and personalization so the whole team sees the plan. Attach the Etsy order link in the card’s Attachments and set the due date for the promised ship window. Add the right label—Rush order, Waiting on customer art, or Local pickup—so urgency is visible. Drag the card into Order Intake once the basics are filled so it’s queued for digitizing.
Pro tip: If you’re missing artwork, label it ‘Waiting on customer art’ before you move on.
Log artwork and digitizing
Move the card to Artwork & Digitizing when files arrive or you start converting them. Duplicate the “Artwork source file” template card to track DST status, backing choice, and stitch instructions. Attach the DST file or vendor link in the card’s Attachments so production never chases email threads. Assign the digitizer and set a due date that keeps proofs on schedule. Use the Thread restock label if you discover a cone is low while you prep colors.
Handle proofs and samples
Only move into Proof & Sample when a stitch-out or mockup is ready. Use the “Proof sent on” card to log send date, approval owner, and next follow-up. Drop in a phone photo of the sample directly on the card so customers can react fast. When approval lands, clear the Waiting on customer art label, leave a card comment with the approval note, and drag the order forward. If a sample is skipped, move straight to Embroidery Production to keep work flowing.
Run production in focused batches
Keep Embroidery Production to the hats you’re running today. Convert cards to tasks when you need a checkbox reminder—machine setup, test sew, full run—so nothing gets skipped under pressure. Assign the operator, note the machine and hoop, and use indenting to group duplicate runs. Set a WIP limit of five cards on the list header so the board flags when you overload the line. When a batch completes, drag cards together into Quality Check & Pack to start finishing.
Pro tip: Cap the list at 5 cards to match what your machines can finish in one shift.
QC, ship, and follow up
In Quality Check & Pack, tick through trim, steam, and packaging steps, attaching the QC checklist or photo as proof. Fill the shipping template card’s tracking, carrier, ship-date, and customer-notification fields before you move the order into Shipped & Follow-up. Add a final reminder—care instructions, pick-up reminder, or review request—so you close the loop with every buyer. Archive shipped cards weekly to keep the board light.
What’s inside
Embroidery pipeline
Follow six clear stages from Order Intake through Shipped & Follow-up so the team always knows what’s next.
Duplicate-locked starters
Drag ready-made cards for order info, artwork handoff, proof notes, and shipping details without retyping fields.
Digitizing toolkit
Log thread colors, backing choices, and DST files directly on the card so production pulls specs in one click.
Sample & proof gates
Optional Proof & Sample list to keep stitch-outs, customer approvals, and change requests organized—collapse or skip it when you don’t need it.
Shipping follow-up
Quality check reminders, tracking-number fields, and follow-up notes keep customers updated after the hats leave the shop.
Why this works
- Anchors every order to the same duplicate-locked intake checklist
- Surfaces digitizing progress and approvals by moving cards through Artwork & Proof lists before machines start
- Keeps embroidery batches small by enforcing list-level WIP limits
- Closes the loop with tracking fields and follow-up tasks on each card before archiving
FAQ
Do I have to use the Proof & Sample list?
No. Skip it entirely if you approve designs elsewhere—move cards straight from digitizing into Embroidery Production.
Can I attach DST files or mockup photos?
Yes. Attach DST files, vendor links, or phone photos directly in each card’s Attachments so production and customers see the latest version.
How do I flag rush or pickup jobs?
Apply the built-in Rush order or Local pickup labels, then filter the board or batch those cards first each day.
Can I reorder or hide stages I don’t need?
Yes. Drag lists to match your flow or collapse Proof & Sample when you skip stitch-outs—the template stays aligned with your board changes.