Etsy Pillows Made-To-Order Production Template
Visual handoffs for every custom pillow order
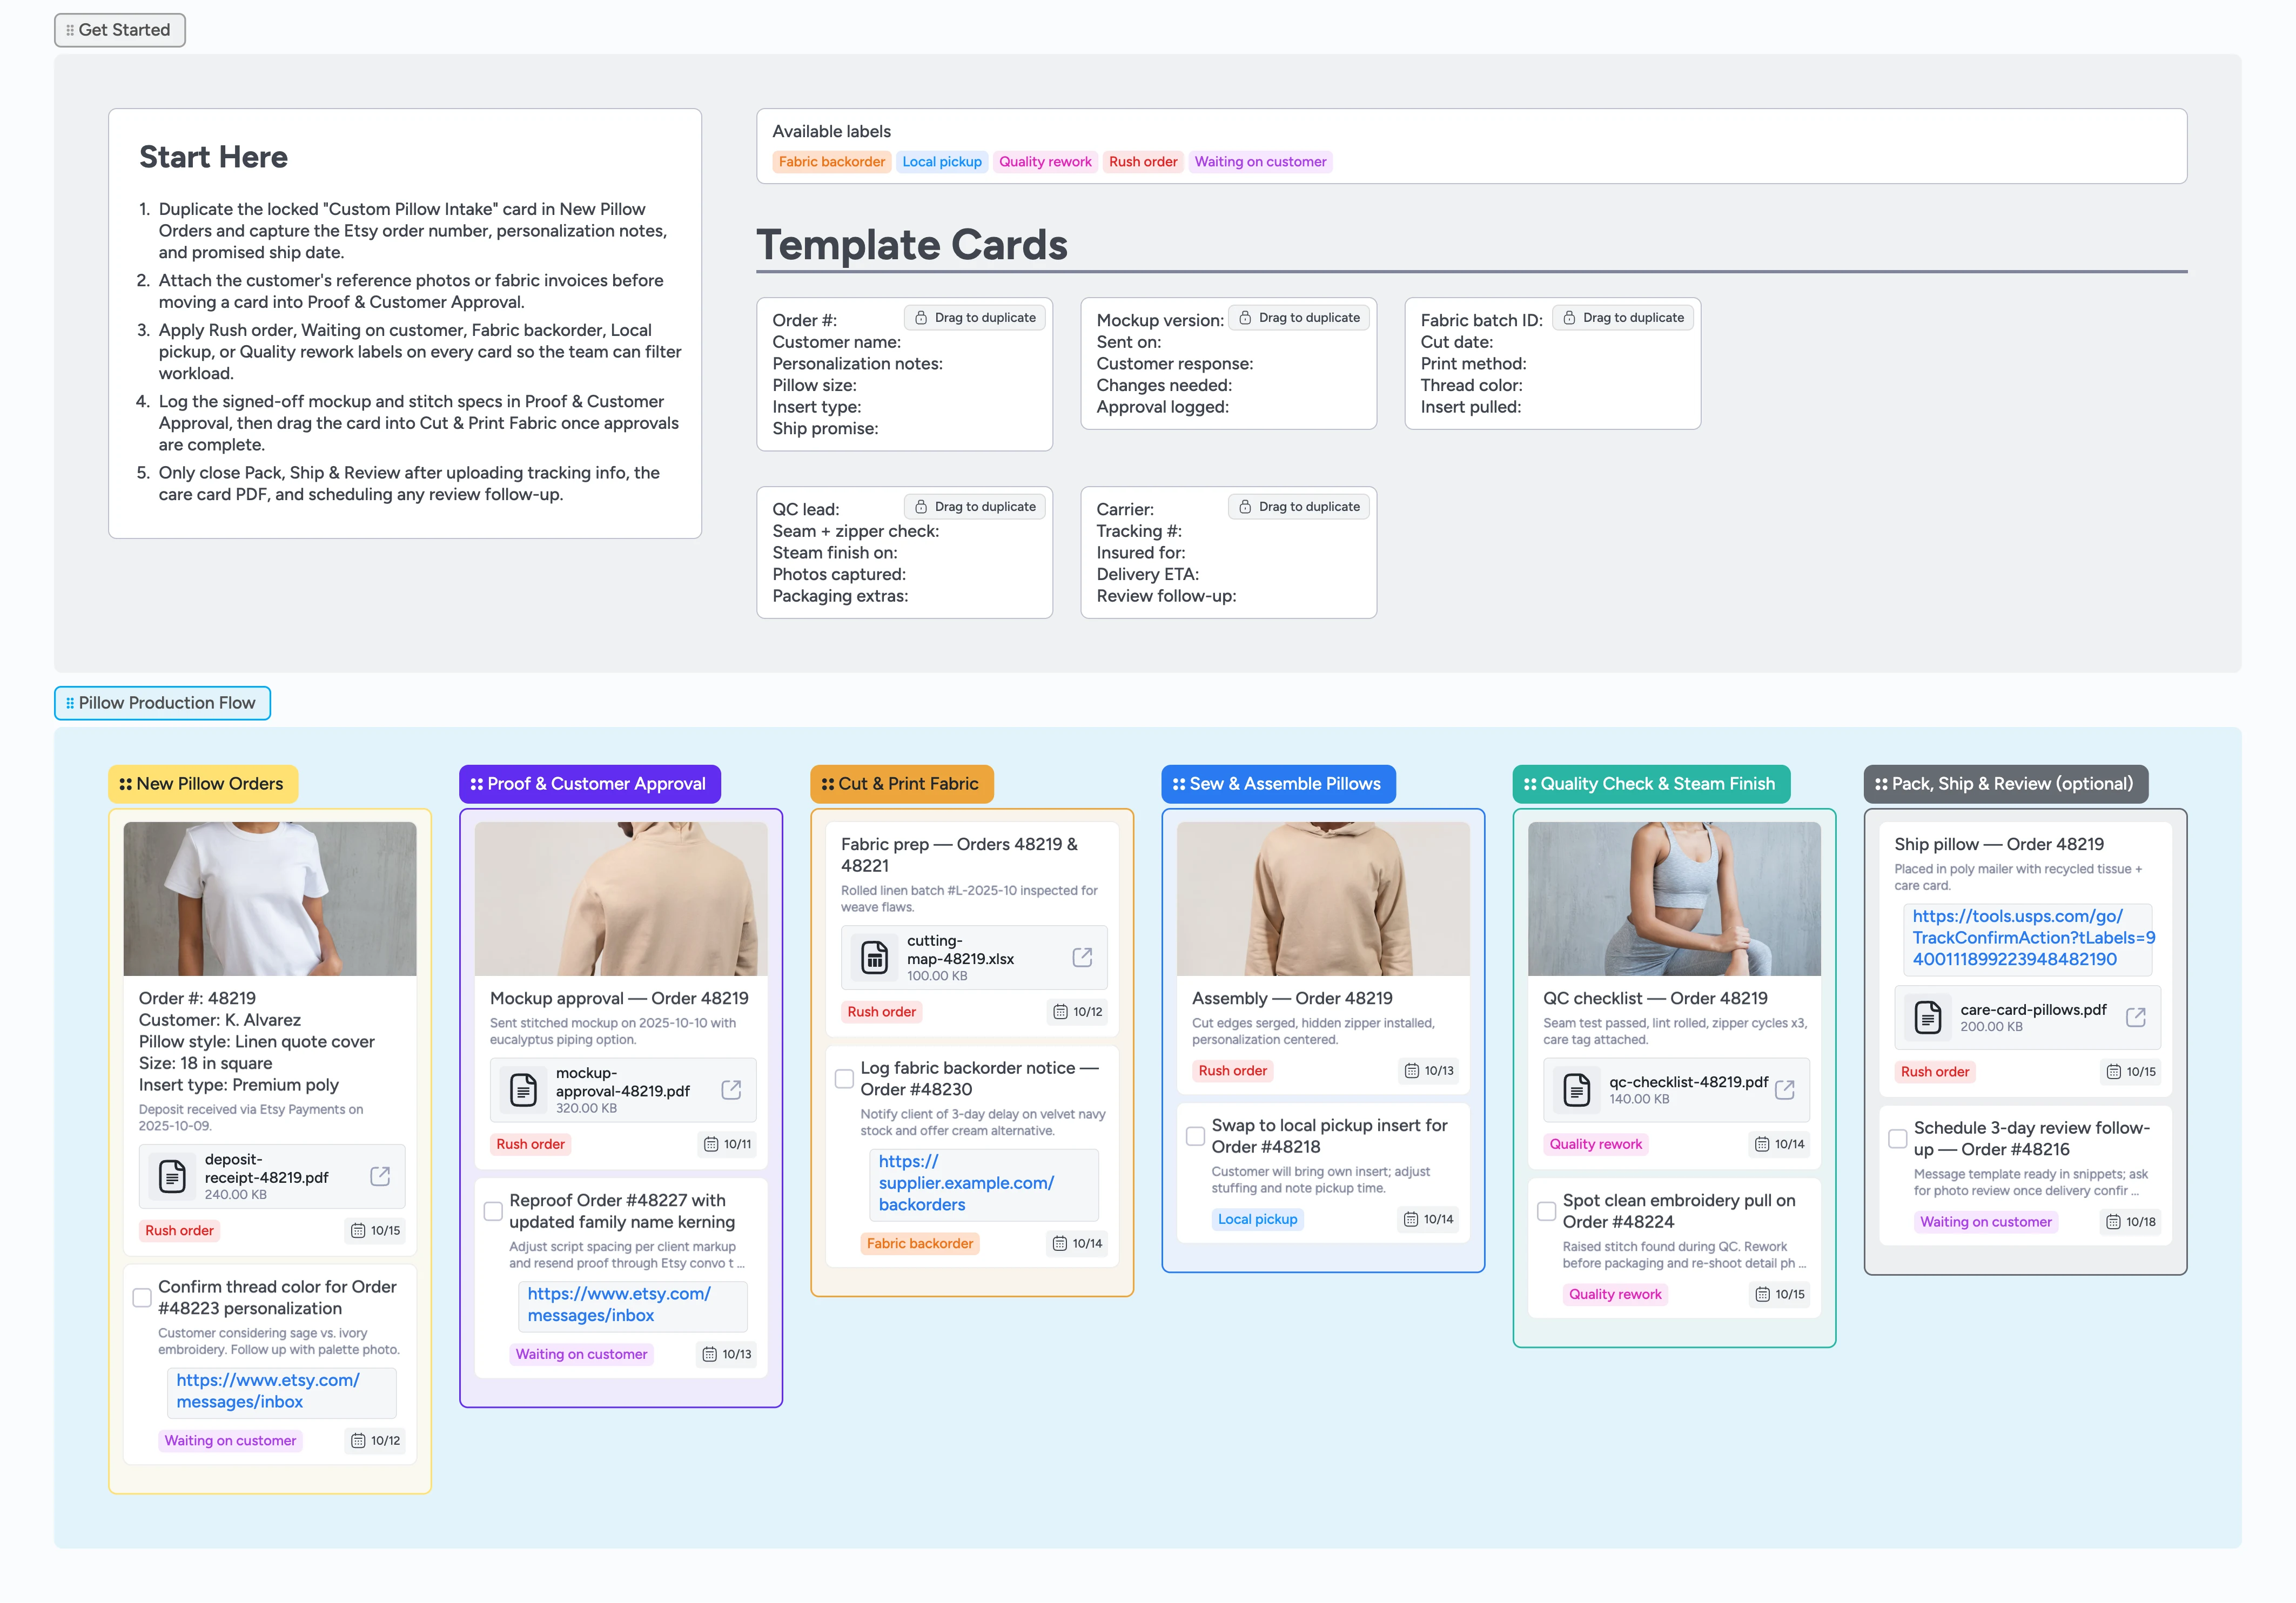
Custom pillow orders stack up fast when every design needs approvals, fabric pulls, and careful finishing. The moment you open the board, duplicate the locked intake card in New Pillow Orders and see the six stages you’ll drag it through. This template keeps the entire journey visible—intake, proofing, cutting, sewing, quality checks, and shipping—so you never chase status inside DMs again. Drag work across labeled stages; every note, due date, and attachment travels with the card so handoffs never require a Slack thread. Rush flags, backorder tags, and follow-up reminders make it easy to prioritize, while the filled example shows how to document every handoff. Walk one order from start to finish and the rest of your queue will follow.
- See every pillow order move from intake to ship-ready at a glance
- Capture approvals, mockups, and QC photos directly on each card
- Flag rushes or fabric delays with labels your team can filter
- Hand off tasks in real time with assignments, due dates, and micro-templates that travel with the card
Intake each pillow order
Start in the New Pillow Orders list and duplicate the locked “Order #” card. Fill in the Etsy order number, personalization notes, promised ship date, and attach the receipt screenshot so the team has context. Assign the order owner and set a due date for proof delivery. If the timeline is tight, add the Rush order label, otherwise mark Waiting on customer until personalization details arrive. Leave any special packaging requests in the description before moving on.
Secure design approval fast
Move the card into Proof & Customer Approval as soon as you send a mockup or stitch sample. Duplicate the “Mockup version” micro-template to track each round, logging when you sent it and what changes are needed. Attach the mockup file or photo plus any reference images so feedback stays in one place, and drop a quick comment with the send timestamp so fabric prep sees the green light instantly. Tag Waiting on customer and schedule a follow-up date if you need a reply. When the client approves, record the timestamp and drag the order into Cut & Print Fabric.
Pro tip: Turn on reminders in the task card so you’re pinged if the client hasn’t replied within 24 hours.
Prep fabric and inserts
In Cut & Print Fabric, duplicate the fabric batch template to note the roll ID, cut date, print method, and insert you pulled. Attach the cutting map or supplier link so anyone can pick up the job midstream. Apply Fabric backorder if stock is tight and leave a comment with the promised restock date. Assign the teammate running the heat press and set a due date aligned with your ship promise. Once materials are ready, drag the card into Sew & Assemble Pillows.
Sew, stuff, and finish details
In Sew & Assemble Pillows, document who is sewing and call out insert swaps or zipper choices in the card description so QC inherits the context automatically. Add process photos or a short clip of the embroidery pass so issues surface early. Convert supporting tasks into checkbox cards for steps like installing hidden zippers or swapping to customer-provided inserts. Use the Local pickup label when someone plans to collect in person. When stitching is complete, move the card into Quality Check & Steam Finish.
Ship with confidence and follow up
Run the QC micro-template to log seam checks, lint rolling, steam finish, and packaging extras in Quality Check & Steam Finish. Attach the final glam photo and any inspection checklist PDFs so the next teammate sees exactly what cleared. Drag the order into Pack, Ship & Review, duplicate the shipping template, and add tracking, insurance details, and your follow-up date. Upload the care card PDF so the packing teammate grabs it without leaving the board, and switch labels if quality rework is needed. Finally, set a reminder task to request a review or testimonial once the carrier confirms delivery.
Pro tip: Copy the review message from the sample card to keep your outreach fast and consistent.
What’s inside
Stage-by-stage production flow
Six lists cover intake, proofing, fabric prep, sewing, QC, and shipping so you drag every order left→right with a clear next move—and nobody has to chase status in DMs.
Reusable intake + QC cards
Locked templates you duplicate, fill, and move capture order details, approval timestamps, fabric batches, and QC checks without retyping.
Realistic demo orders
Study the sample cards, then duplicate the pattern to assign teammates, add due dates, and attach proofs, cutting maps, and care cards that travel with each stage.
Priority labels
Filter work instantly with Rush order, Waiting on customer, Fabric backorder, Local pickup, and Quality rework tags.
Review follow-up tracker
Keep post-delivery outreach visible with tasks, reminders, and tracking links in the Pack, Ship & Review lane.
Why this works
- Maps every pillow order across proofing, production, and fulfillment on a shared canvas so the whole crew sees movement in real time
- Keeps approvals, mockups, and QC evidence attached to the exact card for instant handoffs
- Surfaces rushes, backorders, and follow-up reminders with labels and due dates your team can filter
- Shows small teams exactly when to move work forward by pairing micro-templates with real demo cards
FAQ
How many orders can this board handle at once?
Instaboard’s infinite canvas means you can keep adding cards and lists; just duplicate the locked intake card for each new order and archive cards once they ship.
What if a customer changes fabric after approval?
Duplicate a new mockup card to capture the revision, tag Fabric backorder if stock is affected, and leave comments noting the updated lead time—everything stays attached to the order card for the next handoff.
Can I share progress with production partners?
Invite them as board collaborators or export a filled snapshot; they’ll see updates live because you attached all files, proofs, and QC photos directly to each order card.
How do I track local pickups differently from shipments?
Apply the Local pickup label, note the pickup window in the card description, and keep the card in Pack, Ship & Review until the handoff is confirmed.