Etsy Wine Glass Production Template
See every wine glass order flow left to right
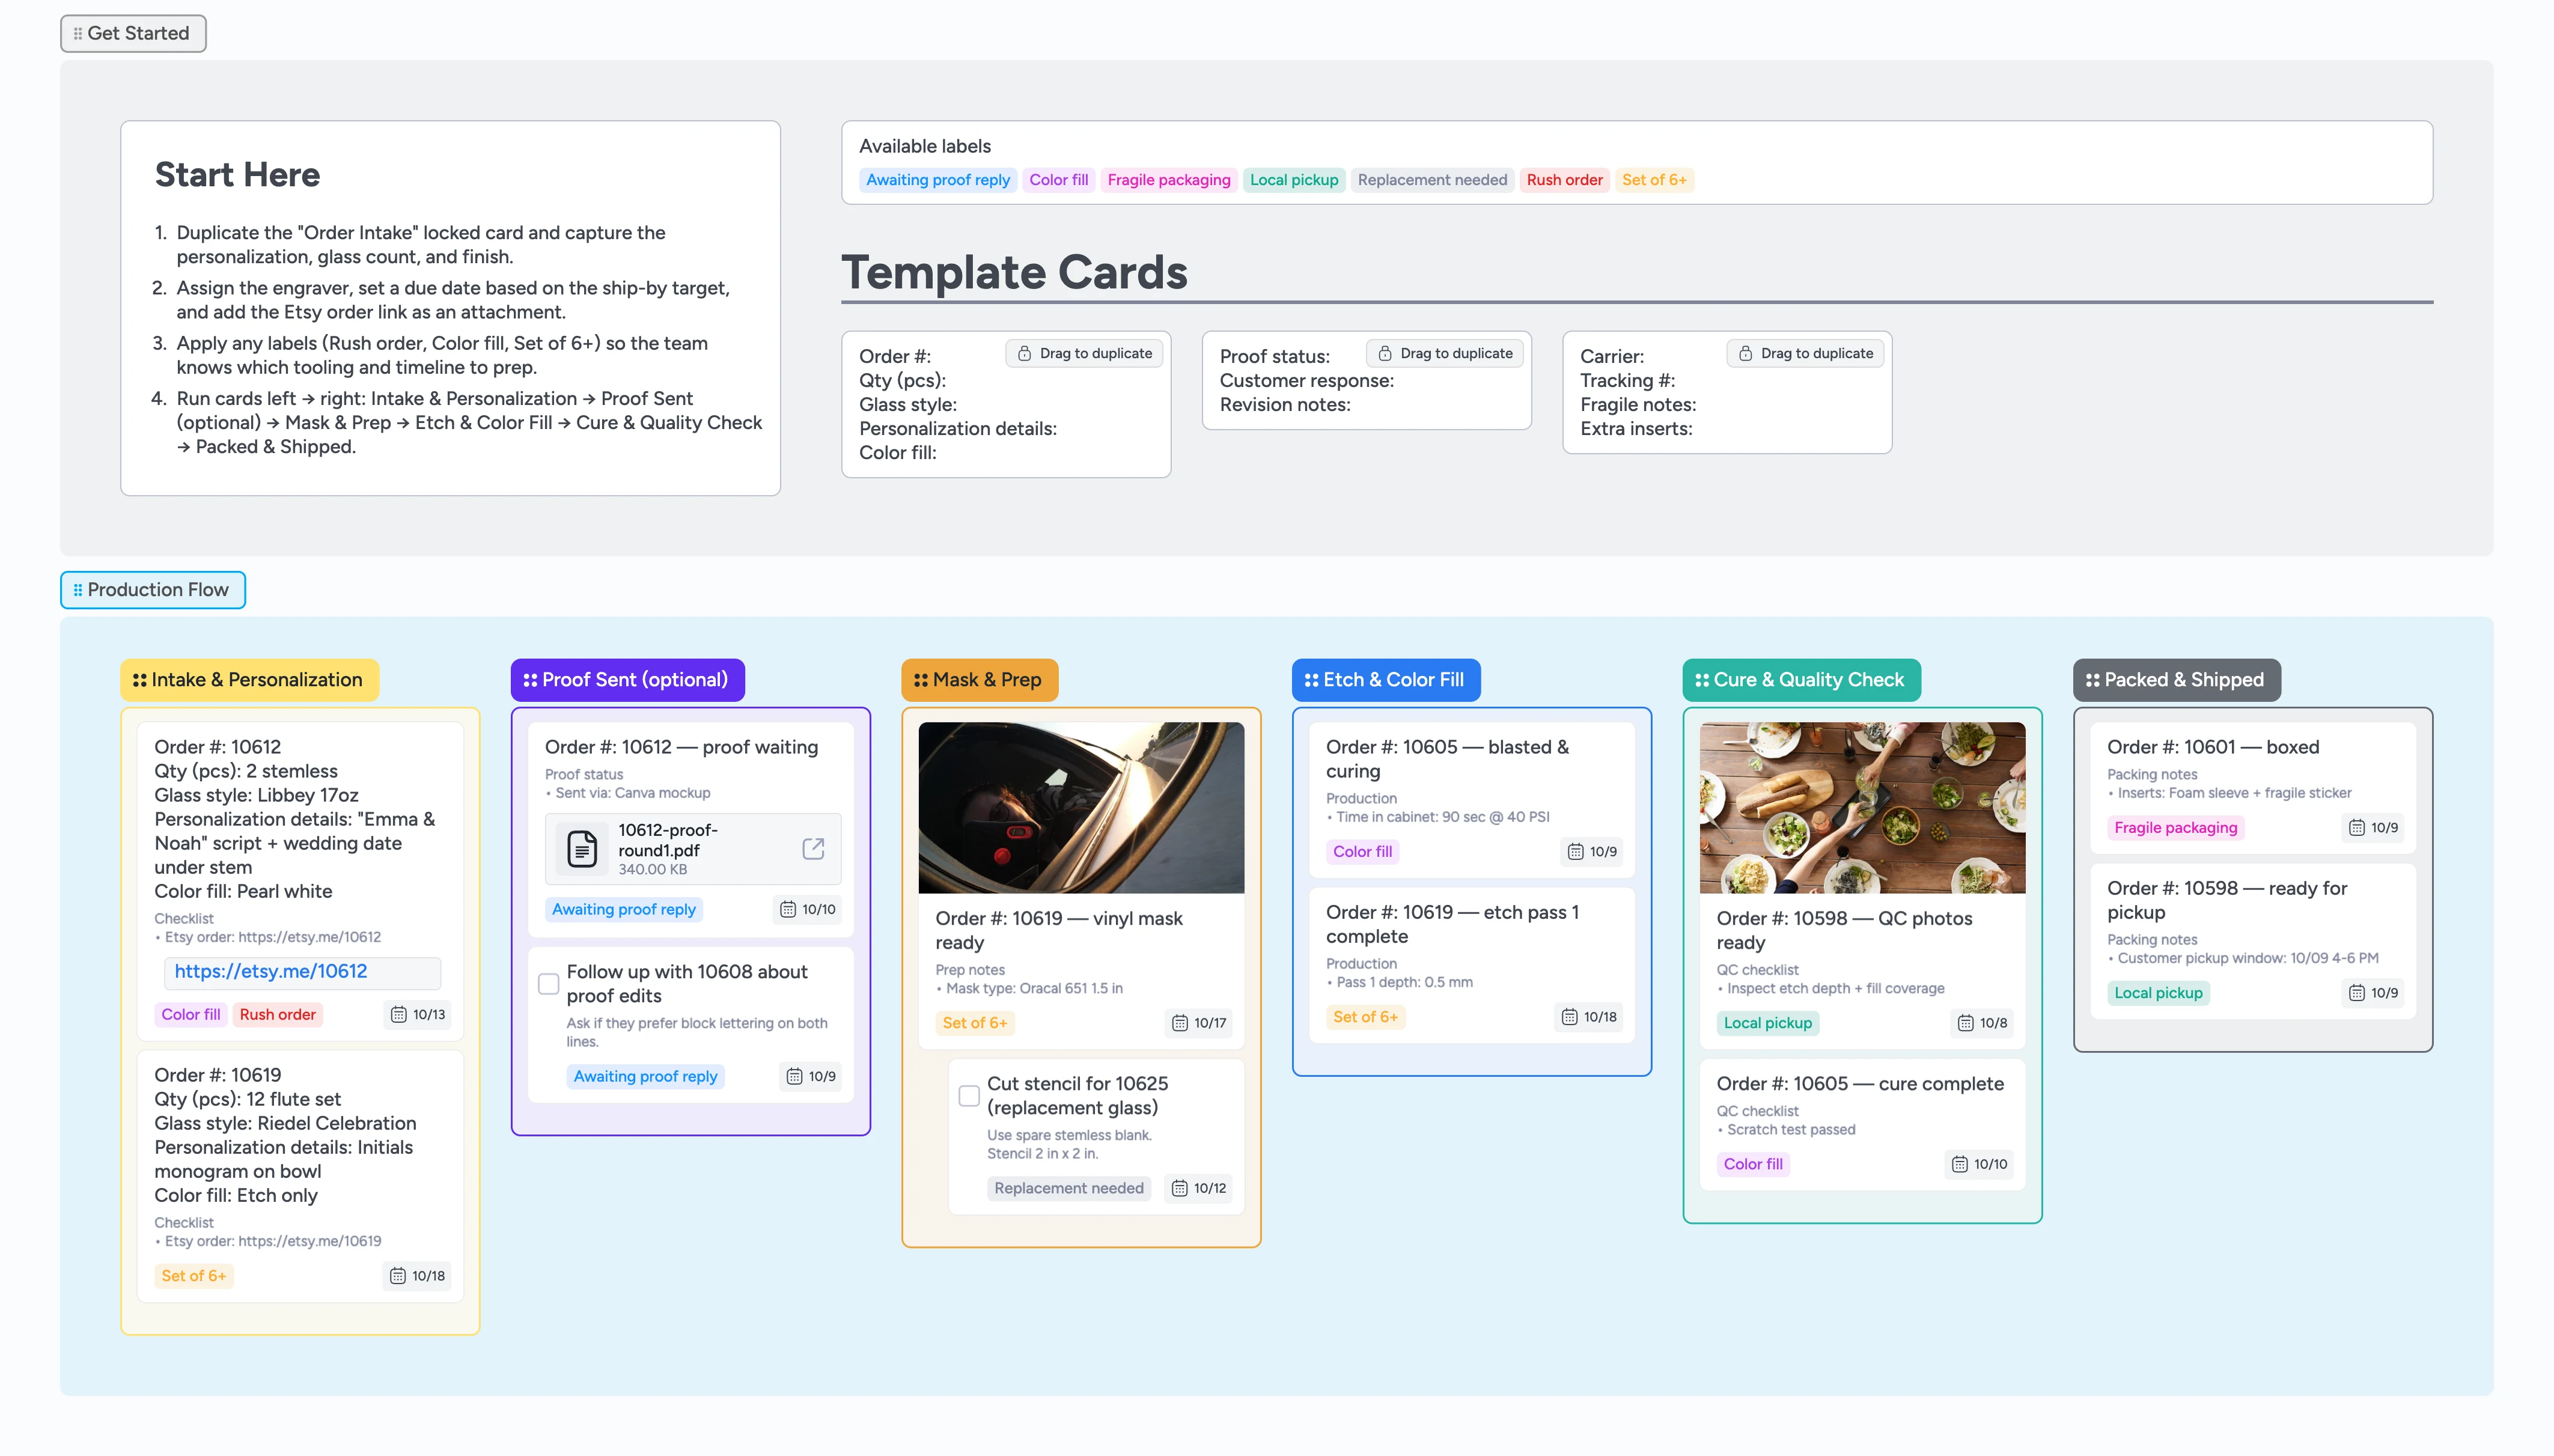
Whether you sandblast, laser, or hand-paint, this Instaboard gives your wine glass shop a reliable run sheet for every made-to-order sale. Intake captures the personalization and glass count, the proof lane keeps customer approvals visible, and production lists guide the crew through masking, etching, curing, and packaging. Labels call out rush jobs, large sets, and pickups so you can batch intelligently and communicate faster. The result: fewer redo requests, happier customers, and a storefront that ships exactly what it promised.
- Duplicate intake cards to capture personalization
- Tag proofs and rush jobs for follow-up
- Batch move matching orders through production
- Store carrier and tracking on the card
Start in Intake & Personalization
Duplicate the locked order intake card and rename the fields only once so every duplicate stays consistent. Paste the Etsy order URL as an attachment, fill the personalization lines with exact customer wording, and drop the glass style or quantity where you will scan it later. Assign the engraver, set the ship-by due date, and apply labels like Rush order or Set of 6+ so batching decisions are obvious. Drag the card into Intake & Personalization and keep that column limited to the next two days of work.
Pro tip: If a name or date feels uncertain, add a quick "confirm personalization" checklist item before moving forward.
Manage proofs without losing replies
When a customer needs a mockup, move the card to Proof Sent (optional) and attach the PDF or image proof directly to the card. Add two short lines—"Proof sent" with the date and "Awaiting reply"—then tag the card with Awaiting proof reply so your daily follow-up sweep is simple. If the buyer requests edits, jot them inside the card body and indent a quick task to capture the redo. Once they approve, untag the card, check the follow-up task, and slide it into Mask & Prep.
Pro tip: Need a nudge? Set the due date three days out so overdue proofs surface automatically.
Prep blanks before you fire up the cabinet
Inside Mask & Prep, use the cards to note stencil vinyl, abrasive grit, and jigs so anyone can finish prep mid-shift. Add checklist sub-items for cleaning the glass, weeding the mask, and taping the stems, and assign them if another teammate is stepping in. Tag large sets or replacements so you remember to pull extra blanks. When everything is staged, multi-select the batch and move the cards to Etch & Color Fill together.
Pro tip: Indent quick tasks like “Cut new stencil” under the main order card to show prep work that must finish first.
Log every etch and color fill pass
In Etch & Color Fill, open the card and type PSI, pass count, and enamel colors directly into the description so the next engraver sees the settings instantly. Attach photos of tricky fills or gradients to the same card instead of storing them elsewhere. If a pass requires overnight curing, set the due date for the next morning and leave a comment noting where the batch is drying. When the fill is fully set, drag the cards to Cure & Quality Check.
Pro tip: Label cards with Color fill whenever enamel or paint is involved so you spot cure times at a glance.
Close the loop with QC, packing, and shipping
Use Cure & Quality Check to attach final photos, log scratch tests, and confirm personalization against the order text. Drop finished cards into Packed & Shipped only after adding carrier, tracking number, and any pickup window in the template fields. For fragile shipments, note the packing inserts or create a quick file attachment with your care card PDF. Archive shipped cards weekly so the board always reflects active work.
Pro tip: Local pickup? Apply the Local pickup label and note the shelf location in the card description.
What’s inside
Personalization intake list
Duplicate the locked intake card, fill the personalization lines, attach the Etsy receipt, and assign the engraver immediately.
Proof approval lane
Move cards into Proof Sent, attach mockups, tag Awaiting proof reply, and track follow-ups with due dates.
Production checklists
Use Mask & Prep and Etch & Color Fill lists to log abrasives, PSI, cure times, and sub-tasks right inside the card description.
Shipping cards
Update the template fields for carrier, tracking, and packaging notes before dragging cards into Packed & Shipped.
Why this works
- Standardizes personalization fields so nothing is missed before production
- Keeps proof approvals visible with dates, files, and follow-up tasks
- Batches similar engraving runs to reduce setup time and mistakes
- Captures packing and tracking details the moment orders leave the studio
FAQ
Will this work if I laser engrave instead of sandblast?
Yes. Swap abrasive and PSI notes for your laser settings in Mask & Prep and Etch & Color Fill, and the rest of the pipeline still fits.
How do I track large wedding party orders?
Tag the card with Set of 6+, list the exact quantity in the intake template, and duplicate the card if you need to split the batch across production days.
Where should I keep proof conversations?
Attach the proof file to the card, log dates inside the description, and use the Awaiting proof reply label so every follow-up lives in one place.
Can I skip the proof lane?
Absolutely. Delete the Proof Sent column and slide cards straight from Intake & Personalization into Mask & Prep if you never send mockups.