Print-on-Demand Fulfillment Template
Command every POD order from one board
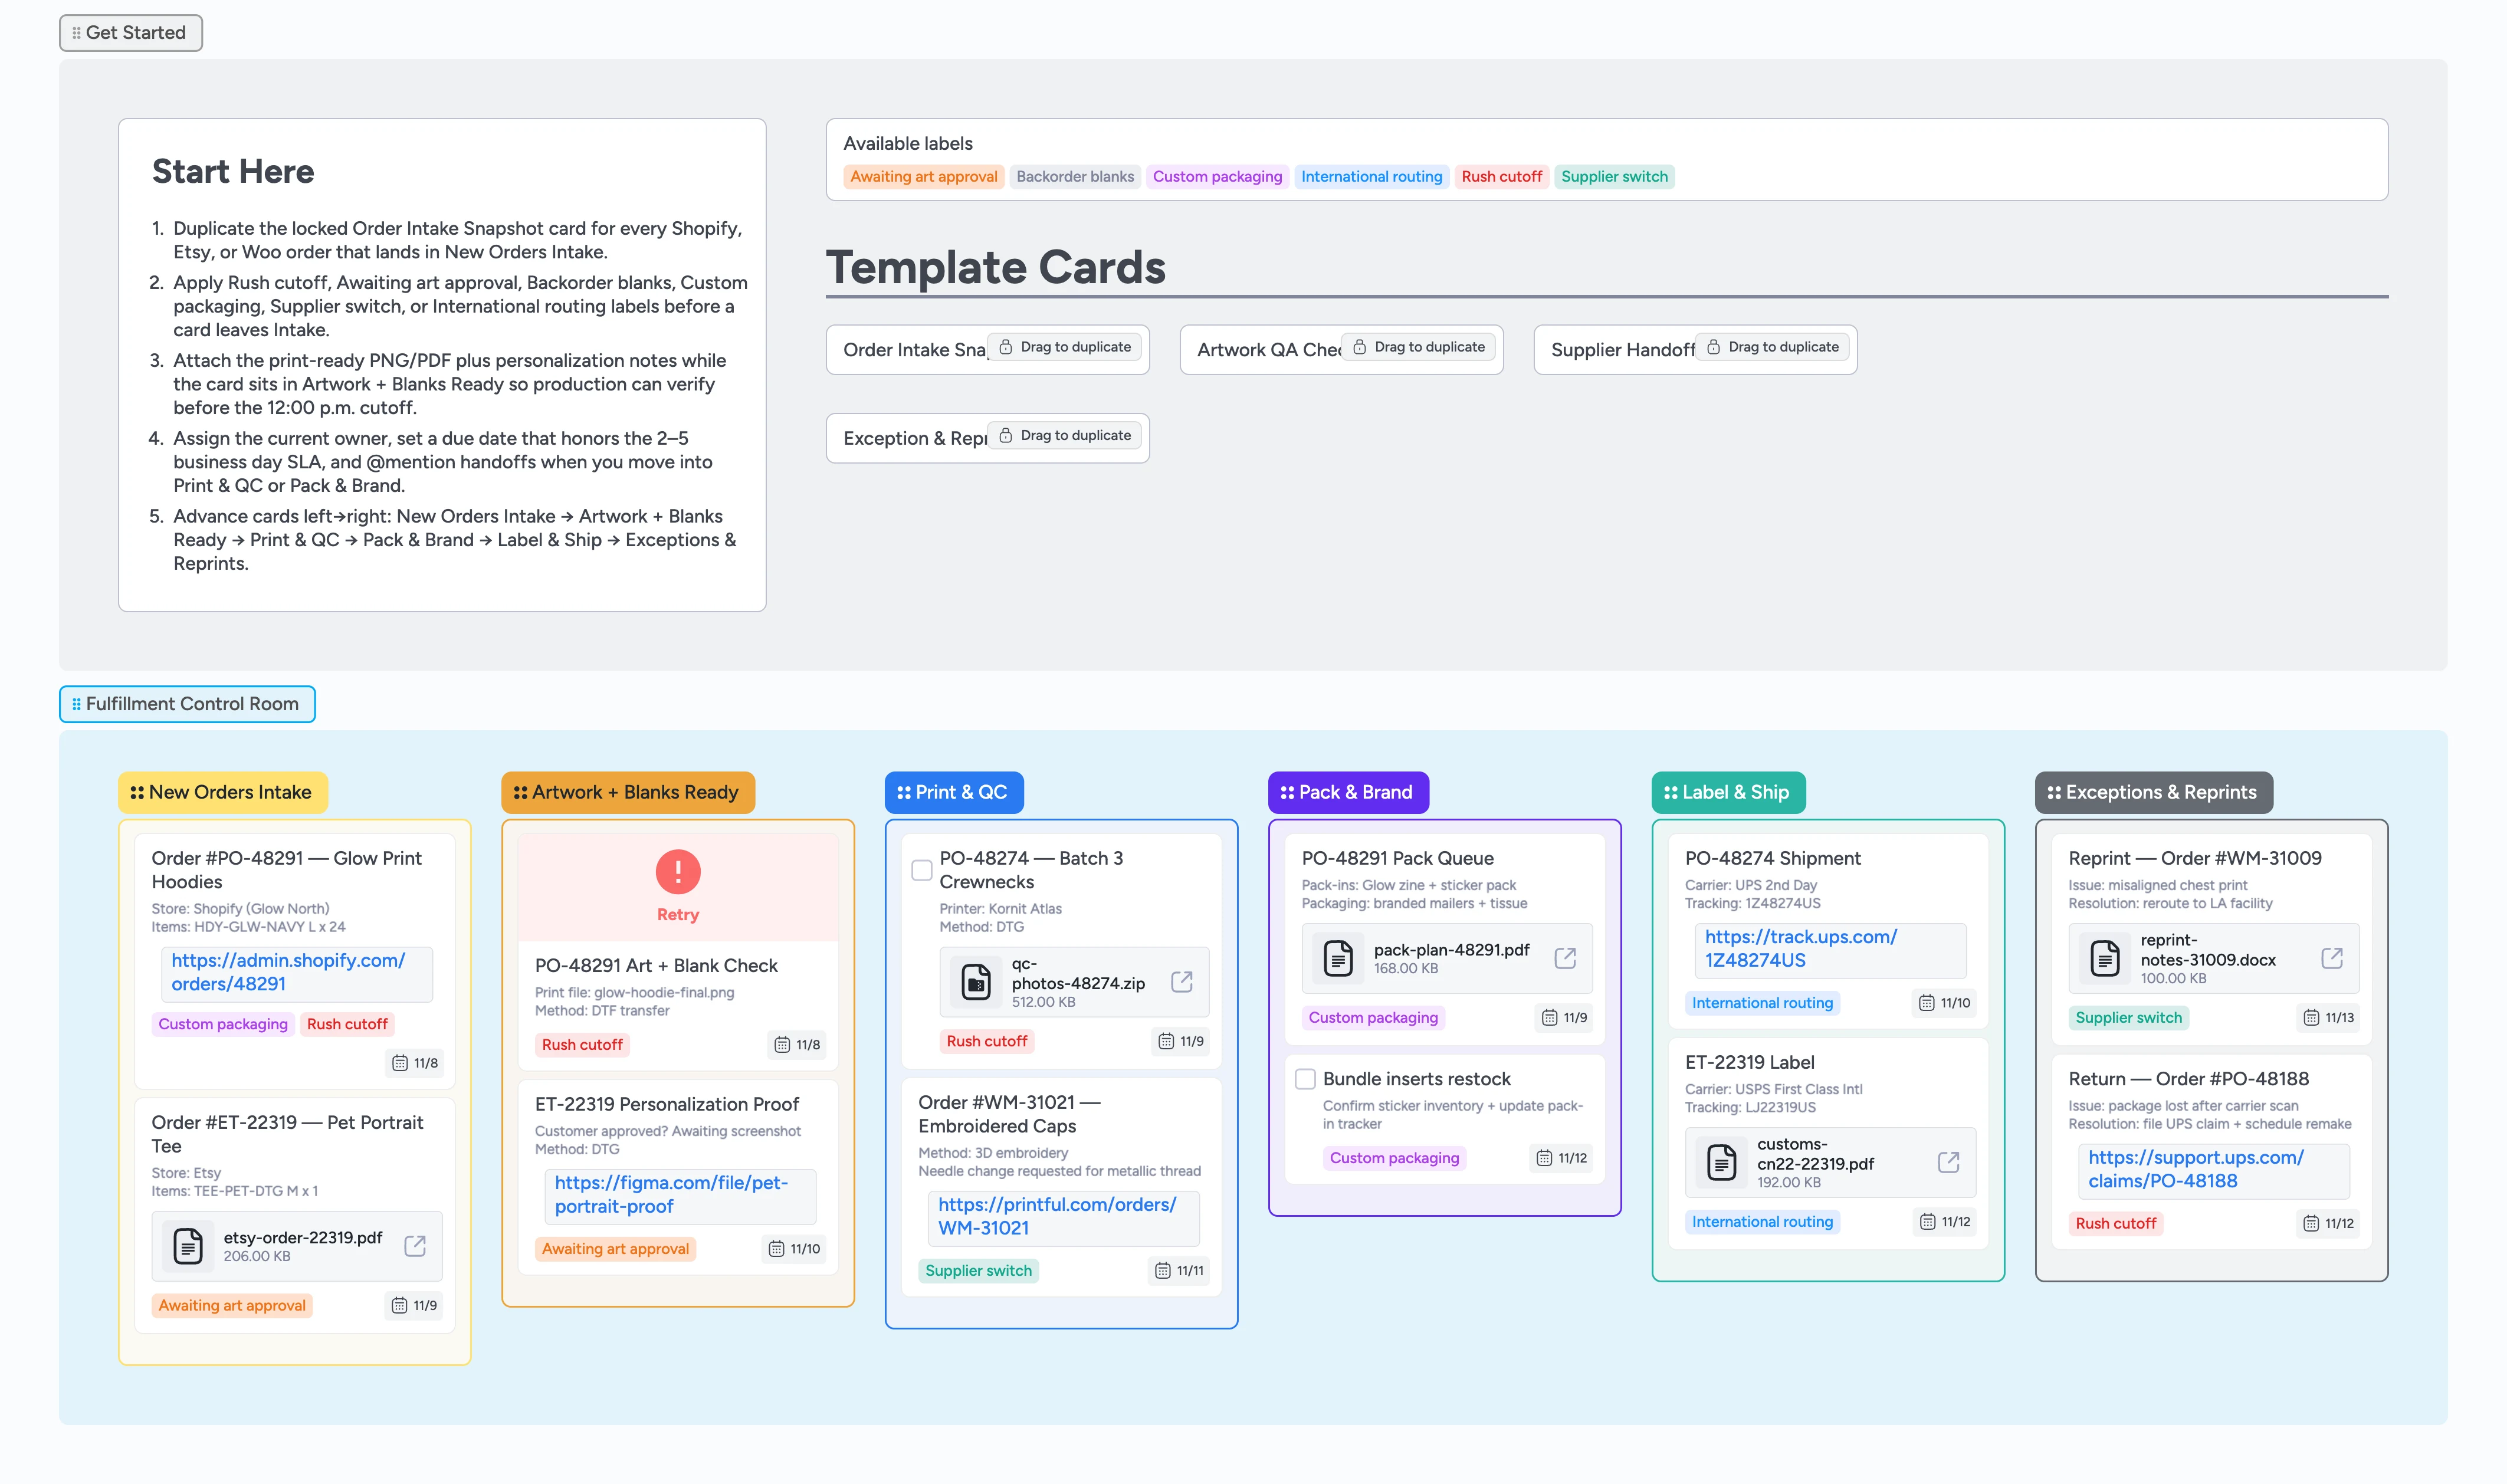
Print-on-demand teams juggle storefront syncs, art approvals, multiple production partners, and carrier cutoffs. This Instaboard workflow template pins every stage on a single board so you can see the true status of every order in under five seconds. Duplicate the intake snapshot, apply rush or supplier labels, attach proofs and customer approvals directly to the card, run print + QC loops with checkbox tasks, and ship with branded pack-ins without touching spreadsheets. Real demo cards sit in each list so you start with filled examples for DTG vs embroidery settings, insert weights, and reprint logs.
- Prevent reprints by capturing every intake detail once
- Catch art issues early by storing proofs on the card
- Ship on time with a repeatable pack-and-label ritual
- Resolve reprints fast with a visible root-cause lane
Spin up Intake in seconds
Open the Get Started section and duplicate the locked Order Intake Snapshot card for every new Shopify, Etsy, or Woo order. Fill Order #, store, SKU variant, quantity, and personalization text exactly as the customer wrote it, then paste the order link in the same field each time. Apply Rush cutoff, Awaiting art approval, Backorder blanks, Custom packaging, Supplier switch, or International routing labels before the card leaves Intake. Set a due date that matches the promised ship window and assign the teammate who owns the next touch. When those fields are ready, drag the card into Artwork + Blanks Ready—this gate keeps Print & QC from chasing missing info.
Pro tip: Pin the labels primer card open while you work Intake so the same colors mean the same thing all week.
Lock art files and blanks before noon
Inside Artwork + Blanks Ready, attach the print-ready PNG/PDF, mockup link, and any customer approval screenshot directly on the card so production always opens the latest file. Use the Artwork QA Checklist micro-template to confirm method (DTG, DTF, embroidery) and color profile, then record how many blanks you’ve pulled in the description. Mention the production lead in comments so they get notified, and set the due date to the 12:00 p.m. cutoff when you expect to release the batch. Cards stay here until proofs are approved and blanks are staged, which keeps Print & QC focused only on work that can move today.
Pro tip: When you’re waiting on a customer reply, leave the card here but keep the Awaiting art approval label on so the pause is obvious.
Run print + QC loops with receipts
Move ready cards into Print & QC and convert any process tasks (needle change, color test) into checkbox tasks so you can mark them done directly on the card. Attach kiln or dryer photos, QC zip files, or supplier screenshots to the card so future audits have the evidence right where the work happened. If a batch shares settings, multi-select the cards and drag them together so you always know which orders ran on the same press. Update tags when a supplier switch happens so Label & Ship knows which carrier lane to pick without another message. Cards only advance to Pack & Brand after QC attachments and comments confirm the run passed.
Pro tip: Use quick reactions (👍, ⚠️) on the card to flag when a QC check passes or needs eyes without writing another paragraph.
Pack with brand standards and ship
In Pack & Brand, open the Supplier Handoff Brief template to list pack-ins, insert instructions, and escalation contacts right on the card. Attach the pack plan PDF or insert photo, weigh the order, and note which line packaged it so QA can audit later. When the parcel is sealed, drag the card into Label & Ship, generate the label, and add Carrier + Tracking lines plus customs documents (CN22, commercial invoice) as attachments so CX pulls everything from one place. Apply International routing or Custom packaging labels so the next shift sees special handling notes at a glance. Leave the card in Label & Ship until the carrier scan posts, then fire the customer update from that same card.
Make exceptions painless
If anything slips SLA, duplicate the Exception & Reprint Log template, fill the trigger, root cause, owner, replacement order number, and customer notification date, then move the original card into Exceptions & Reprints. Tag Supplier switch or Rush cutoff so you can filter weekly. Attach claim PDFs, reprint proofs, or refund receipts to the exception card instead of searching email. Review this lane in standups to decide which supplier or SKU needs attention, then archive the card only after the reprint ships and finance logs the cost.
What’s inside
Fulfillment control room
Six color-coded stages cover New Orders Intake through Exceptions & Reprints so you can spot bottlenecks and rebalance staff before SLAs slip.
Order template cards
Duplicate-locked cards capture channel, SKU variant, personalization, and ship window the same way every time so any teammate can duplicate and work the same checklist.
Art + blanks checklist
A dedicated list keeps proofs, color profiles, and pulled blanks in view before the noon cutoff so nothing hits the press without approvals and stock staged.
Label primer
Rush cutoff, Awaiting art approval, Backorder blanks, Custom packaging, Supplier switch, and International routing labels live beside Start Here so your crew applies the same color for the same situation.
Exception lane
A permanent list logs reprints, returns, and supplier switches so finance and CX have one place to pull history.
Why this works
- Forces every storefront to use the same intake data
- Prevents printers from touching work without approved art
- Keeps pack-ins and customs docs visible before pickup
- Captures exceptions where finance and ops can resolve them
FAQ
Can I run multiple storefronts in one board?
Yes. Include the storefront name in the Order Intake Snapshot fields and reuse the built-in label set (Rush cutoff, International routing, etc.) or add your own channel labels so you can filter quickly.
What if my supplier fulfills automatically?
Keep Intake and Exceptions on the board, but skip the middle stages. Use the cards to track art approvals, pack-ins, and any orders you pull back for manual QC.
How do I visualize KPIs?
Pin a "Weekly Metrics" card at the top of Exceptions & Reprints and record orders past SLA, on-time %, and per-supplier lead time every Friday so trends stay on the board.
Does this work for international shipping?
Yes—use the International routing label plus attachments for CN22 or commercial invoices, then store tracking links on the card for CX follow-ups.