Property Tenant Onboarding Pipeline Template
Standardize every tenant move-in from application to keys
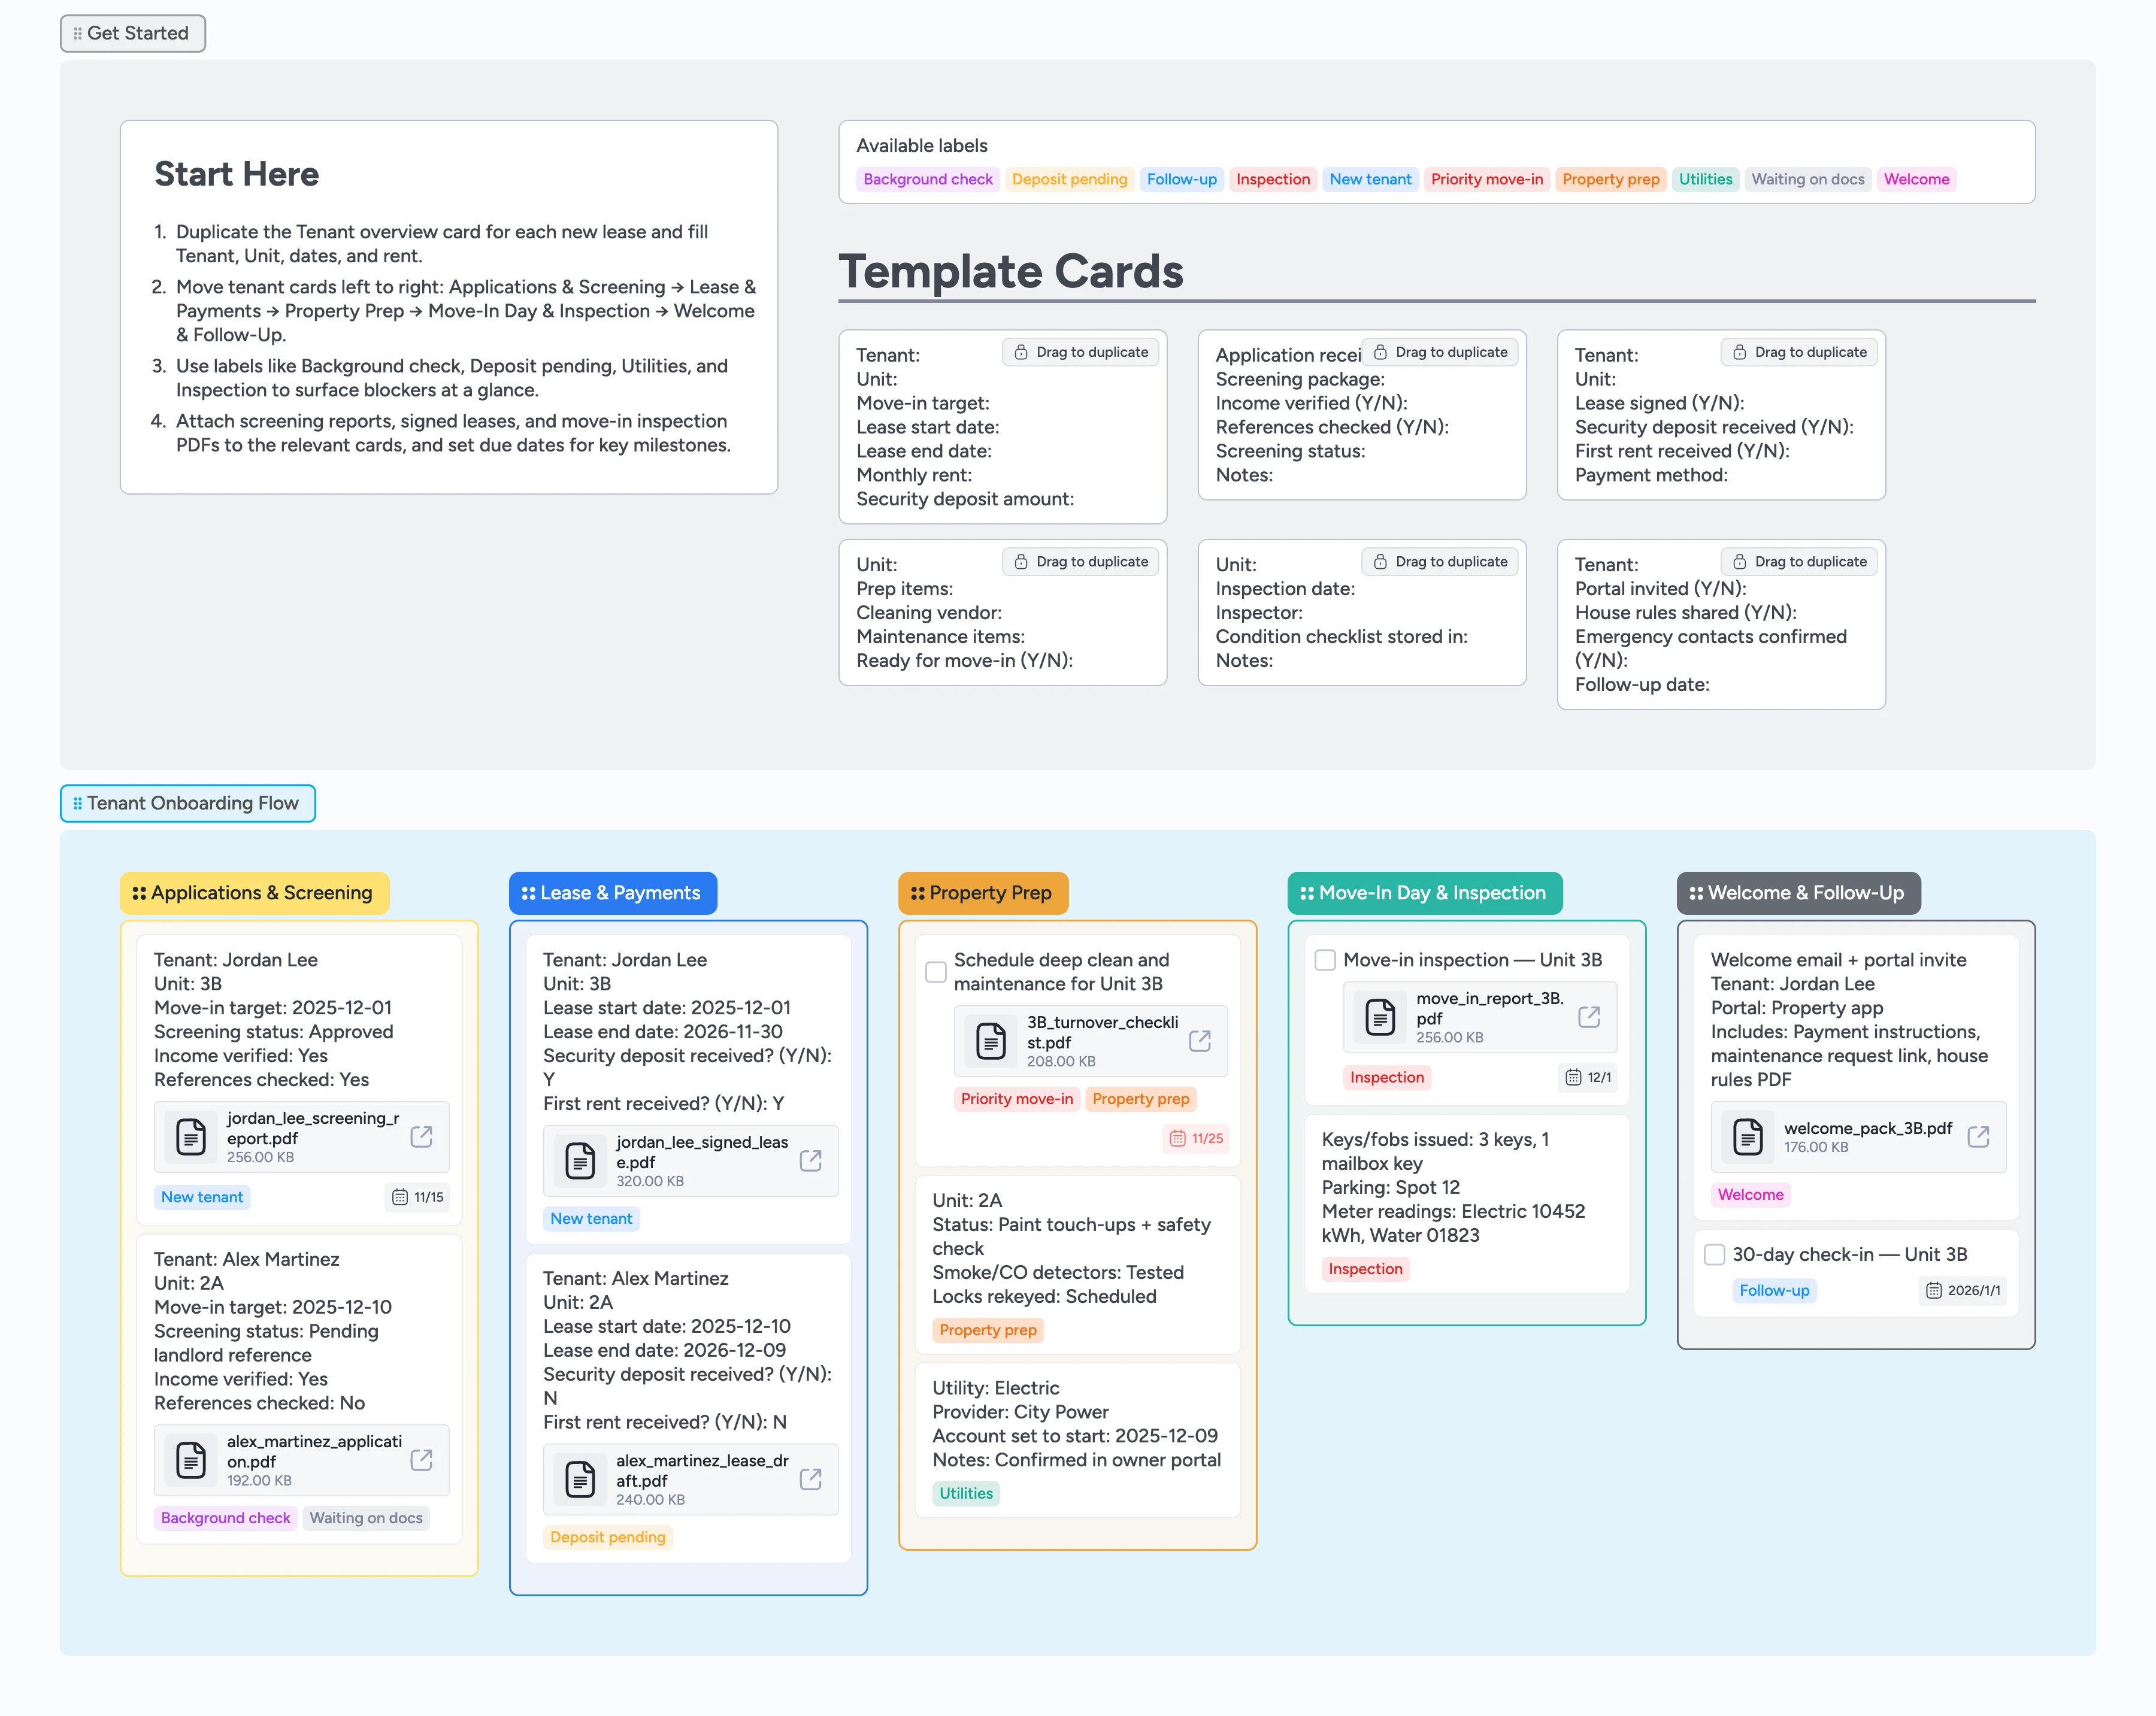
Turn tenant onboarding into a repeatable pipeline instead of scattered emails and sticky notes or "Did we collect the deposit for Unit 3B?" moments. This template tracks each lease from application and screening through lease signing, property prep, move-in inspection, and welcome follow-up, so you always know who owns the next step. Use micro-template cards to capture key details for each tenant, keep screening decisions and deposits visible, and document property condition with attachments. As you progress, assign a leasing or maintenance owner, set move-in due dates, and move cards left to right so your team can see who is moving in when, what is blocked, and what still needs attention before handing over the keys.
- Track every application, lease, and move-in on one board
- Spot blockers fast with labels for screening, deposits, utilities, and inspections
- Attach screening reports, signed leases, and move-in checklists directly to cards so the latest version is always visible
- Use due dates to time-box move-in prep and orientation tasks
- Duplicate tenant micro-templates so new staff can follow the same process
Start in Get Started and create tenant cards
On the board, go to the Get Started section and locate the Tenant overview template card. Duplicate it once for each new lease you are working on. Fill in tenant name, unit, target move-in date, lease dates, rent, and deposit amount. If someone on your team owns the move-in, assign them to the card and set a due date for the move-in milestone. Drop each tenant card into the Applications & Screening list to kick off the pipeline.
Track applications and screening decisions
Open the Screening record template card, duplicate it for the tenant, and fill in application date, screening package, income verification, references, and the overall decision. As you receive reports, attach PDFs or links to the tenant card so evidence stays in one place. Apply labels like Background check or Waiting on docs whenever something is still in progress. When a tenant is approved, update the status on the card and confirm the target move-in date so scheduling stays realistic. Keep declined applications in the same stage for history or archive them once you are done.
Finalize lease and payments in one view
In the Lease & Payments stage, duplicate the lease template card to track whether each lease is signed and money has cleared. Attach signed leases as files and note the lease start and end dates on the card. Use the Deposit pending label for anyone who has not yet paid their deposit or first month. Assign an owner for collecting funds and set due dates ahead of move-in so nothing slips. Once the lease is fully signed and payments are in, move the card into Property Prep.
Prepare the unit and run move-in inspection
In Property Prep, use the prep template card to list cleaning, repairs, and safety checks for each unit. Create task cards for deep cleans, maintenance items, and lock changes directly in the Property Prep list, and assign them to vendors or team members. Set due dates based on the move-in target and use the Property prep and Utilities labels to flag work that could block move-in. On move-in day, move the tenant card into the Move-In Day & Inspection stage and attach your inspection checklist and photos. Record key details like meter readings and keys issued directly on the card so you have a single source of truth.
Welcome tenants and schedule follow-up
In the Welcome & Follow-Up stage, use the welcome template to track portal invites, house rules, and contact details. Attach the welcome pack PDF or move-in email so your team can see exactly what tenants received. Set a due date for a 7-day or 30-day check-in and create a follow-up task card for any outstanding issues. Apply the Follow-up label to items that still need action after move-in so they stay visible. As tasks are completed, check them off and move cards toward the end of the pipeline.
What’s inside
Five clear onboarding stages
See at a glance which tenants are stuck in screening versus ready to move in. Applications & Screening, Lease & Payments, Property Prep, Move-In Day & Inspection, and Welcome & Follow-Up show where every lease sits in the flow.
Tenant and screening micro-templates
Reusable cards for Tenant overview, Screening record, Lease and payments, Property prep, Move-in inspection, and Welcome follow-up. Duplicate them to capture the same fields for every new resident.
Labels for common move-in risks
Filter for blocked tenants or urgent move-ins in seconds using labels like Background check, Deposit pending, Utilities, Inspection, Priority move-in, and Waiting on docs.
Attachments for evidence and handover docs
Keep a clear audit trail without digging through email threads or folders by attaching screening reports, signed leases, inspection PDFs, and welcome packs directly to cards.
Follow-up after move-in day
Use follow-up cards and due dates to schedule 7-day or 30-day check-ins. Track any outstanding maintenance or paperwork so tenants feel supported after they get the keys.
Why this works
- Standardizes tenant onboarding so every lease follows the same checklist
- Keeps screening, deposits, and property prep visible to the whole team
- Makes move-in readiness obvious by showing which units are blocked or late
- Creates an audit-friendly trail of inspections, handovers, and follow-up actions
- Scales with your portfolio so new staff can manage move-ins the same way
FAQ
Can I use this for multiple properties or buildings?
Yes. Treat each card as a specific tenant and unit, and use labels or tags to indicate which property or building they belong to. Use the label filter on the board to focus on one property at a time when you are reviewing move-ins.
Where should I store sensitive documents like ID copies?
Keep sensitive files in your property management system or secure document storage, and use this board to track status and attach non-sensitive versions where needed. You can still add links or notes on cards so the team knows where documents live or link to the secure folder from the card.
What if my onboarding process has different stages?
You can rename stages, add a Waiting list, or insert extra steps like HOA approval to match your process. Then keep duplicating the same template cards so every tenant follows your custom steps.
Can I reuse this board for renewals as well as move-ins?
Many teams reuse the same pipeline for lease renewals. Duplicate a tenant card into Applications & Screening or Lease & Payments, update the dates and rent, and reuse the prep and follow-up stages for renewal inspections or changes.