Webflow Build-to-Handoff Pipeline Template
Run Webflow handoffs inside Instaboard today
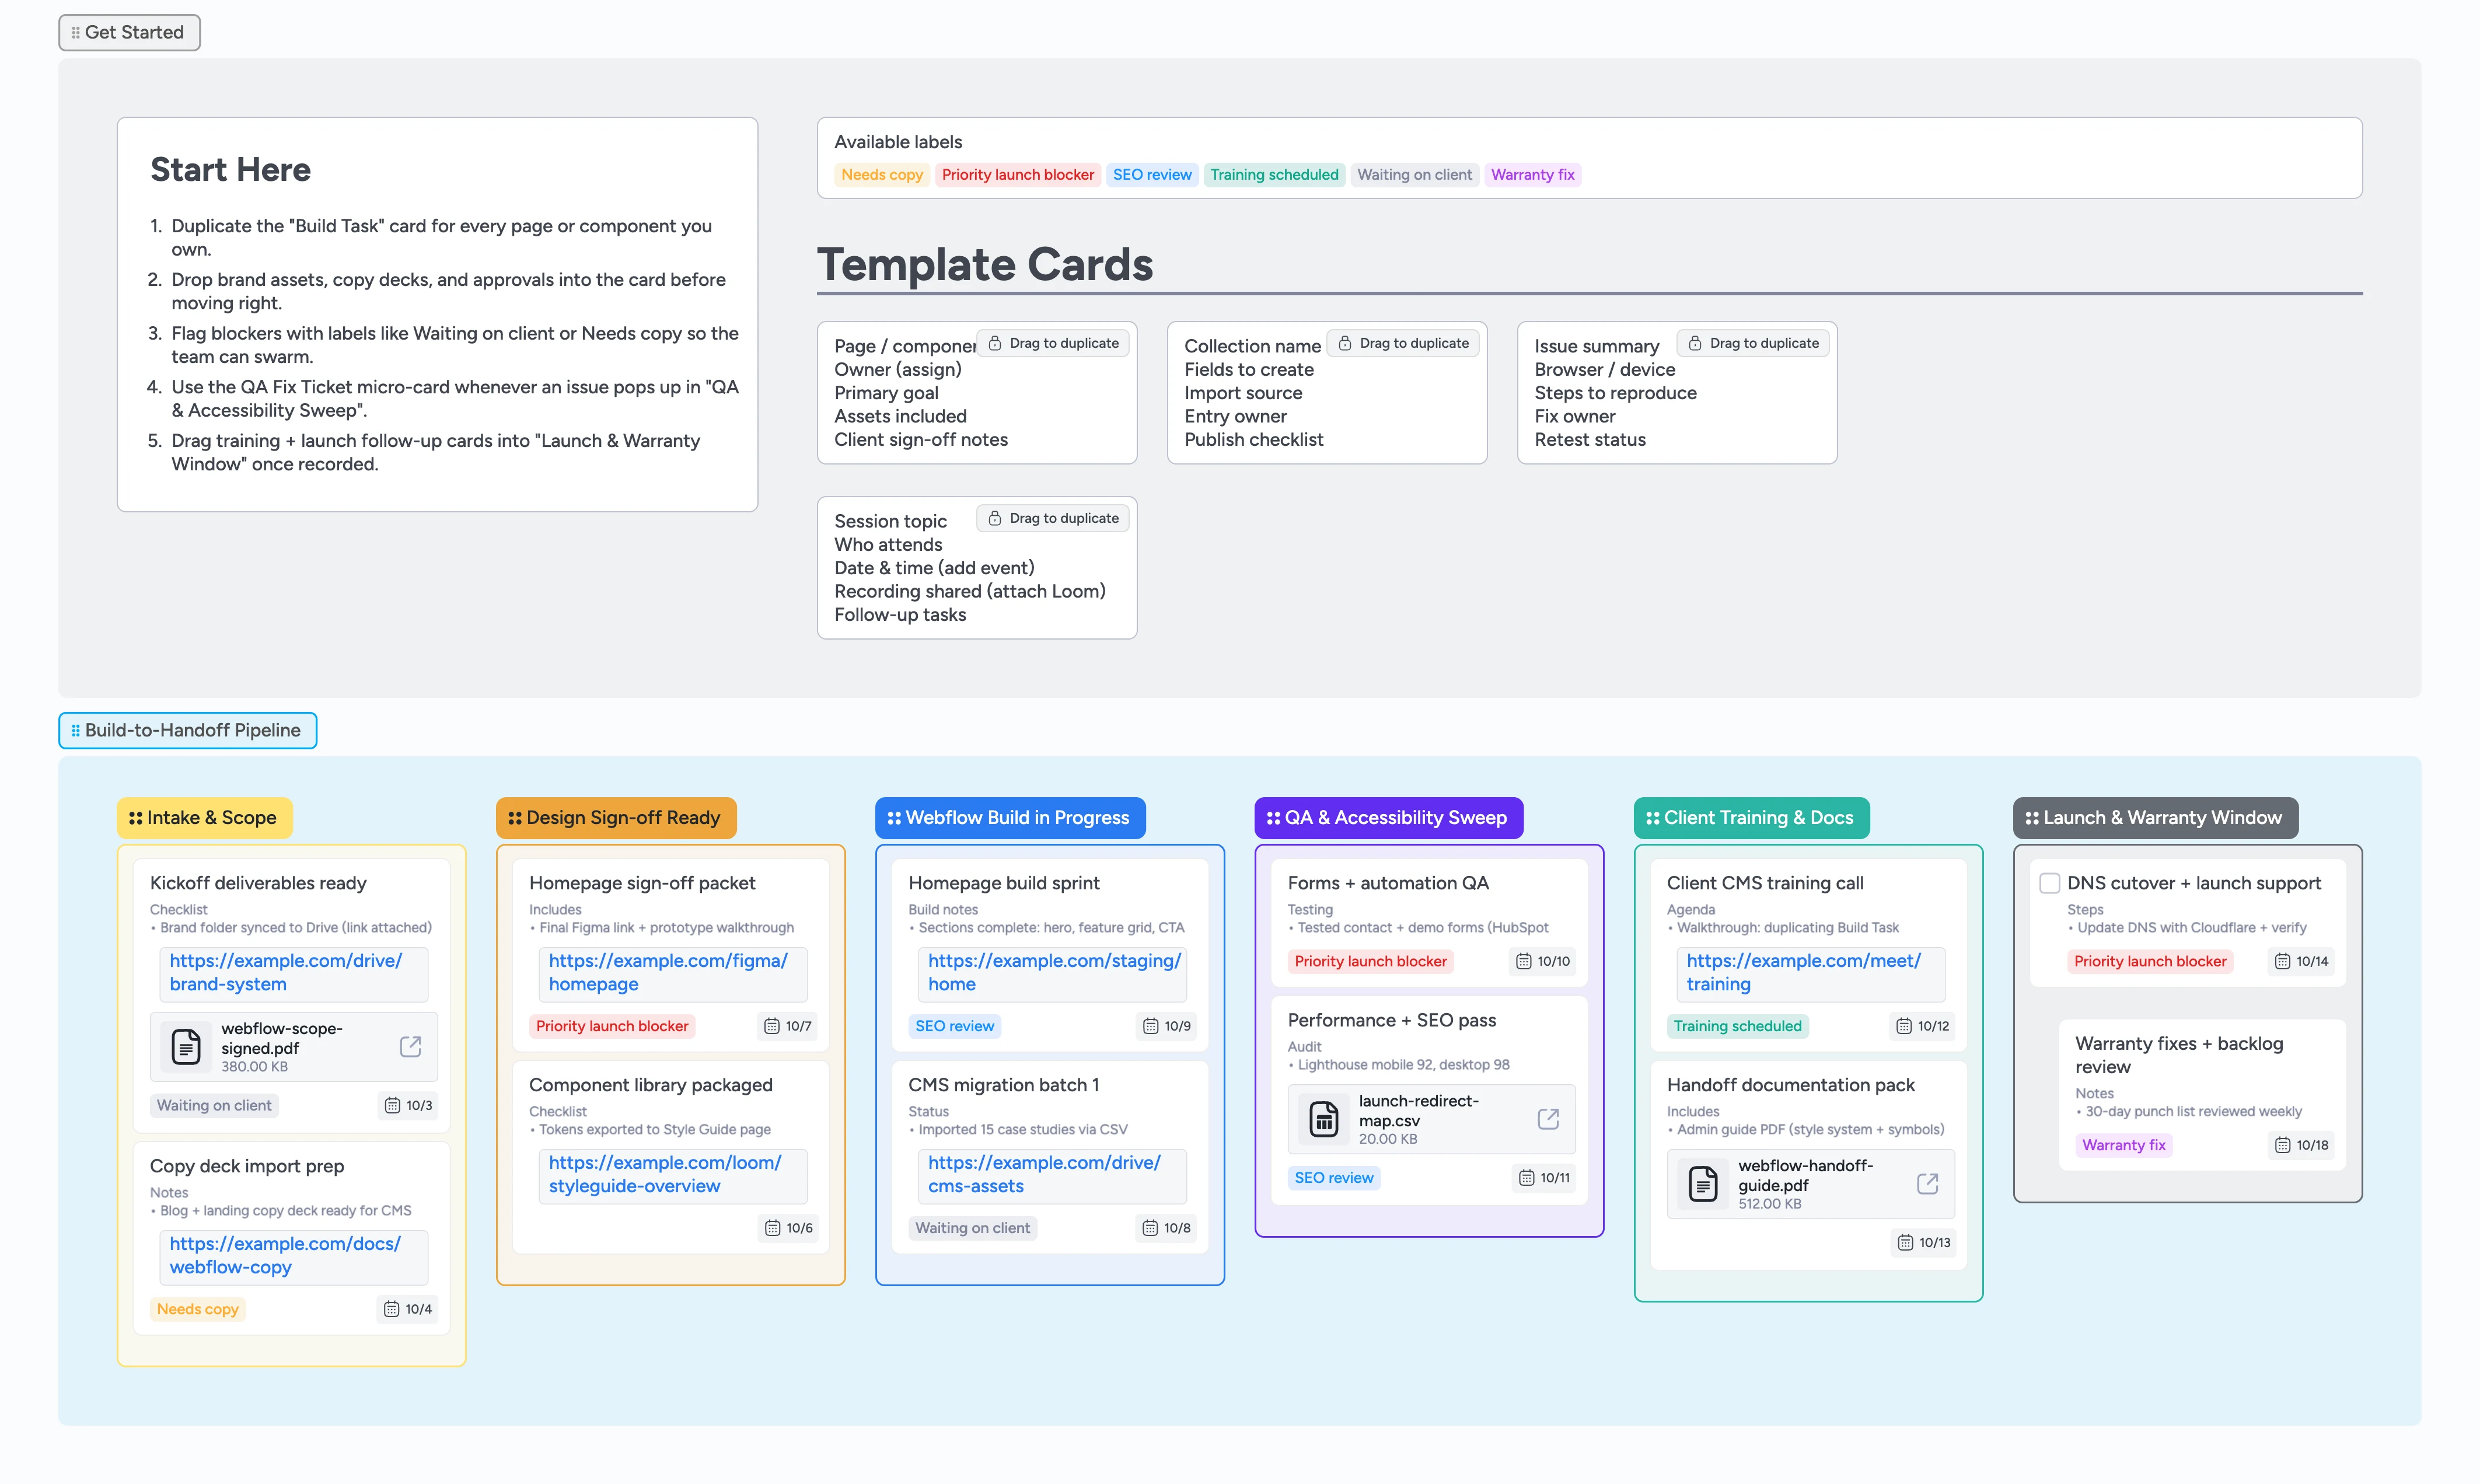
Inside this Instaboard template you get a visual control center that keeps every build stage, asset, and approval in the same canvas. Move work from intake tasks and component sign-offs through QA sweeps, client training, and the warranty window without losing context. Duplicate locked micro-cards to capture every page, CMS import, and bug report with the right metadata attached. Assign owners, apply labels, and stash Looms, PDFs, and redirect maps directly inside the board so nothing gets buried in email threads. When launch day arrives, everything you promised is already staged, documented, and ready to ship.
- Drag every build task through Intake, Build, QA, and Launch
- Attach approvals, Looms, and redirect maps to the exact card
- Tag owners and blockers with labels that stay visible in real time
- Package client training and warranty coverage without leaving the board
Kick off in Intake & Scope
Open the Get Started section and read the Start-Here card so you know which micro-cards to duplicate first. Drag the "Build Task" template into Intake & Scope for every page or feature in play. Assign the owner, set a due date, and attach the scope PDF or Loom walkthrough to the card. Apply labels like Waiting on client or Needs copy to flag anything still blocked. Move the card to Design Sign-off Ready once the client approves the visuals.
Package designs for approval
Drag design cards onto the Design Sign-off Ready column whenever comps or component libraries are ready to review. Attach the final Figma prototype, style guide references, and accessibility notes right inside the card so the client sees exactly what will ship. Record sign-off dates in the description and @mention teammates if extra polish is needed. When approvals land, mark the checklist items in the description and slide the cards into Webflow Build in Progress. If assets go missing, relabel and move the card back left to keep expectations clear.
Build and stage in Webflow
Duplicate the Build Task template for each page, collection, or automation you’re executing and drop them into Webflow Build in Progress. Link staging URLs, CSV import sources, and CMS asset folders by attaching them directly to the card. Use the description to note which components draw from the style guide so future edits stay consistent. Assign yourself or a teammate to the card and track blockers with the Priority launch blocker label. Advance each card to QA & Accessibility Sweep once the staging version is publish-ready.
Run QA and accessibility sweeps
Create a QA Fix Ticket card for every bug, form error, or performance snag you catch. Attach Lighthouse exports, redirect maps, or screenshots so fixes are easy to reproduce. Use the card description to log browser/device coverage and mark which automations or analytics tags passed. Apply the SEO review label when meta tags, 301 redirects, and structured data are locked. Once the fixes re-test clean, move the work into Client Training & Docs.
Train the client and launch cleanly
Drag the training session template into Client Training & Docs, assign the owner, and add the calendar invite plus Loom recording. Pack the handoff documentation card with the style guide PDF, maintenance plan, and warranty terms before you move it forward. For launch, duplicate the Build Task card into Launch & Warranty Window, convert it into a task so the go-live checklist is visible, and walk through DNS cutover, SSL, and analytics monitoring. Keep the card open during the warranty window to log fixes or change requests with the Warranty fix label. Close the loop by archiving resolved QA tickets and confirming the client has everything they need.
What’s inside
Start-here guidance
A multi-line Start-Here card and locked micro-templates walk freelancers through duplicating build tasks, QA tickets, and training sessions.
Six-stage pipeline
Columns cover Intake & Scope through Launch & Warranty so you drag cards left to right, assign owners, and surface blockers with labels.
Realistic demo cards
Sample tasks include owners, due dates, labels, and attachments like Figma links, redirect maps, and PDF handoff guides.
Label primers
Pre-built tags such as Waiting on client, Needs copy, and Training scheduled make escalations instant.
Training + launch lane
Dedicated space for Loom recordings, documentation packs, and DNS launch checklists keeps the warranty window tight.
Why this works
- Keeps every approval, asset, and launch checkpoint inside one board
- Shows clients the value of your process with real documentation and training
- Catches QA, SEO, and automation issues before launch day
- Makes warranty fixes traceable and easy to close
FAQ
How detailed should my build cards be?
Include the page or component name, the attached assets you used, and any dependencies or integrations, then assign an owner and due date so nothing stalls.
Where do I track post-launch tweaks?
Use the Launch & Warranty Window column, duplicate the QA Fix Ticket template for each request, and tag them with Warranty fix until the window closes.
Can I adapt this for larger teams?
Yes—duplicate the board, add team-specific labels, and expand the micro-templates with extra metadata fields for dev, QA, or marketing roles.
What if the client needs ongoing support?
Keep the documentation pack card updated with retainer options and next check-in dates, then move it into your account management board when the warranty ends.